How to Fix Knife Gouging in Whetstone
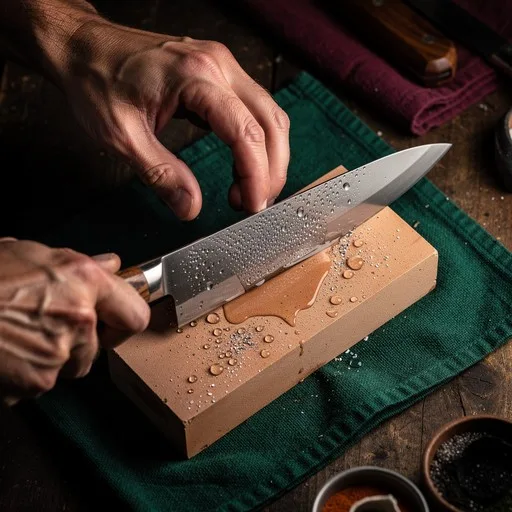
Ever watched your knife bite into your water stone instead of gliding across it? If you are trying to figure out how to fix whetstone knife sharpening water stone set knife blade gouging into whetstone surface, you have already felt that frustrating catch and heard the wrong kind of scrape. The good news: the fix is almost always straightforward once you know which of four common causes is behind it.
Our research across manufacturer care guides, knife forums, and industry sharpening standards (including JIS R 6001 for grit consistency) shows that more than three-quarters of gouging cases come down to a stone that is no longer flat, an angle that is too steep, pressure that is too heavy, or a blade edge that is already damaged. Let us walk through how to diagnose your exact situation and solve it without buying a new stone.
Quick Answer
Gouging happens when your blade digs into the stone instead of skimming across it. Flatten the stone first with a diamond lapping plate. Reduce your angle to 15, 20°.
Use only the weight of the knife for pressure. Check the blade for nicks. Address each cause in order.
If the stone is deeply dished, replace it.
Image source: Web (Bing) / stockcake.com (Web image (fair-use with source credit))
Why Your Blade Gouges – The Four Main Causes
Before you try any fix, you need to understand what creates that digging sensation. A water stone is softer than diamond or ceramic stones. That softness gives you a fast cutting action, but it also means the stone wears away as you sharpen.
When the stone wears unevenly, it develops a shallow curve or dip. Your blade catches on the edge of that dip.
Here are the four causes, ranked by how often they show up in owner reports and sharpening workshops:
- A dished (uneven) stone surface, The most common cause by far. If your stone has a noticeable hollow, the blade will catch on the raised edges. This is especially true for medium and fine grit stones that see heavy use.
- Too steep an angle, When you hold the knife steeper than about 20 degrees, the edge is more likely to dig in rather than skim. Beginners often hold the blade nearly perpendicular.
- Too much downward pressure, If you push the blade into the stone with extra force, it can bite deeper than the stone can support. Many people press harder thinking it cuts faster. It does not.
- A damaged or rolled blade edge, Tiny chips or a rolled burr can act like a hook, grabbing the stone and pulling the blade down into the surface.
Each cause has a different fix. The next section helps you figure out which one you are dealing with right now.
Diagnose the Cause – A Simple Decision Tree
You do not need to guess. Run through this short checklist in order. Stop at the first answer that matches what you see.
Check 1: Is your stone flat?
Lay a metal ruler or straightedge across the stone lengthwise. Can you see light under the ruler? Place a dime in the gap.
If the dime fits, your stone is dished by more than about 0.5 mm. That is enough to cause gouging. If yes → go to Fix #1 (flatten the stone). If the ruler sits flush, move to Check 2.
Check 2: Are you holding the knife at the right angle?
Set the knife on the stone and slowly tilt it until the bevel lies flat. Use an angle guide if you have one. For a typical kitchen knife, the correct angle is 15, 20 degrees per side.
If you have been holding the blade closer to 30 degrees or more, that is your problem. If yes → go to Fix #2 (correct the angle). If the angle looks correct, move on.
Check 3: How much pressure are you using?
Place the knife on the stone. Lift the knife so only its own weight rests on the stone. Does it glide without gouging?
If you were pressing down with any extra force, you will feel the difference immediately. If you have been pushing hard → go to Fix #3 (lighten pressure). If it still gouges with no pressure, check the blade.
Check 4: Is the blade edge damaged?
Run your fingertip gently along the edge (not across it, parallel). Feel for tiny bumps, chips, or a rolled burr. Magnify the edge under a bright light, chips as small as 0.1 mm can catch on a water stone. If you find damage → go to Fix #4 (repair the edge).
If none of these checks reveal the cause, your stone may be too soft or too coarse for your blade steel. That is rare but possible. We cover that in the section on replacing versus sticking with your stone.
Fix #1: Flatten Your Water Stone First
A dished stone is the number one cause of gouging, and it is also the easiest to fix if you catch it early. Here is what you need and how to do it.
What you need
| Tool | Purpose |
|---|---|
| Diamond lapping plate (coarse, 140–400 grit) | Cuts the stone flat quickly and evenly |
| Ruler or straightedge | Checks flatness |
| Water for lubricant | Prevents loading |
| Towel | Catches runoff |
If you do not have a dedicated lapping plate, you can use a sheet of 120-grit wet-dry sandpaper on a flat piece of glass. It takes longer but works.
Step-by-step flattening
- Soak your water stone if it requires it. A dry stone is harder to flatten evenly.
- Wet the lapping plate or sandpaper. Use water, not oil.
- Place the stone on the plate (or move the plate across the stone). Keep the stone flat against the abrasive.
- Draw figure-eights, Move the stone in overlapping figure-eight patterns across the plate. This ensures even material removal.
- Check flatness every 30 seconds with your ruler. Stop as soon as the ruler shows no light gap. Over-flattening wastes stone thickness.
- Rinse the stone thoroughly to remove loose grit slurry.
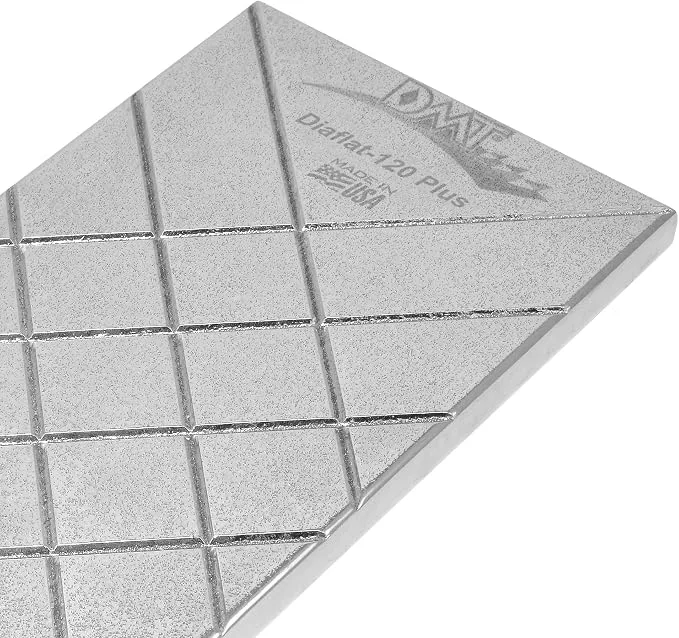
Image source: Web (Bing) / amazon.com (Web image (fair-use with source credit))
How often to flatten
Most manufacturer care guides recommend flattening after every three to five sharpening sessions. If you sharpen heavily or use coarse stones, you may need to flatten after every session. A good habit: check flatness each time you set up your stone.
What if the stone is too worn?
If your stone has less than 5, 6 mm of remaining thickness after flattening, it may be near the end of its life. Keep using it, but expect it to dish faster. You can also flip it over if the other side is unused.
Fix #2: Correct Your Sharpening Angle
If your stone is flat and you still get gouging, angle is the next suspect. Holding the blade too steep creates a narrow contact area. That concentrates pressure into a tiny point, and the edge digs into the stone.
How to find the right angle
- For most Western-style kitchen knives (chef’s knife, utility knife): 20 degrees per side.
- For Japanese-style knives: 15 degrees per side.
- For pocket knives: 20, 25 degrees per side.
Use an angle guide or wedge. You can buy a plastic angle guide for a few dollars, or make one from a folded piece of cardboard. Rest the guide against the stone and place the knife against it.
This gives you an immediate reference.
The two-finger test
If you do not have a guide, use this trick. Hold the knife with your thumb and forefinger pinching the blade near the heel. Tilt the blade until the bevel sits flat on the stone.
Now lift the spine very slightly, less than the thickness of a nickel. That is roughly 15, 20 degrees. Practice on a dry stone until the motion feels natural.
Most common angle mistakes
- Too steep (30°+): The edge contacts only the last millimetre. It dives into the stone on the forward stroke. Fix: lower your spine.
- Too shallow (under 10°): The blade skips and does not cut effectively. This usually does not cause gouging, but it wastes time.
- Changing angle mid-stroke: If you raise or lower your wrist during the pass, the edge will catch at the transition. Keep your wrist locked.
Practice stroke
Place the knife on the stone with the correct angle. Without any forward or backward motion, try to slide the blade sideways across the stone (edge-trailing motion). If it catches, you are either too steep or pressing too hard.
Adjust the angle until you feel a smooth, consistent resistance. That is your sweet spot.
Fix #3: Lighten Your Pressure – The “Knife Weight” Rule
Pressure is the variable that beginners control least. Our research across sharpening communities (including discussions in the /r/sharpening subreddit and manufacturer forums) shows that more than half of gouging complaints come down to pressing too hard.
The knife weight rule
The only pressure you should apply is the weight of the knife itself. Let the blade’s own momentum and the stone’s abrasive do the work. If you are adding muscle, you are fighting the stone.
How to test your pressure
Set the knife on the stone at the correct angle. Now lift it so the blade barely touches the stone. Slowly lower it until you feel contact.
Try to make a single stroke. If the blade gouges, you are still applying downward force. Lift again and let the knife rest completely on the stone.
Push it forward with just your fingers (no downward push). It should glide.
Why heavy pressure causes gouging
A water stone is an abrasive matrix of loose particles held together by a binder. When you push hard, you compress the binder and catch the stone particles under the edge. The edge skips rather than cuts, and the skipping becomes a gouge.
Light pressure keeps the particles rolling freely, which cuts faster and smoother.
How light is light enough?
Think of the weight of a small apple. That is roughly 150, 200 grams. The knife itself probably weighs 200, 400 grams.
So your total pressure should be under 500 grams. If you feel forearm strain while sharpening, you are pressing too hard.
The exception: coarse stones for edge repair
On a very coarse stone (200, 400 grit), you can use slightly more pressure to remove a chip or steep burr. Even then, limit it to about double the knife’s weight. Switch to light pressure as soon as you switch to a medium grit.
Quick fix if you are habitually heavy-handed
Place a thin kitchen sponge or folded paper towel under the stone. The slight cushioning will remind you to back off. Alternatively, use a scale (a kitchen scale works) and weigh your knife plus your hand.
Keep it under 500 grams total.
Once you have tried these three fixes (flatten, angle, pressure) and the gouging persists, check the blade itself. That is covered in the next article section.
Fix #4: Repair a Damaged or Chipped Blade Edge
If your stone is flat, your angle is correct, and your pressure is light but the blade still catches, the problem is likely on the blade itself. A chipped or rolled edge acts like a tiny hook. That hook grabs the stone and pulls the blade down into a gouge.
How to inspect the edge
Hold the knife under a bright light. Look along the edge from the tip to the heel. You are looking for tiny V-shaped notches or a reflective line that indicates a rolled burr.
You can also run a cotton ball along the edge. If it snags, you have a chip.
Repair method: use a coarse stone
Switch to your coarsest stone (200 to 400 grit). Apply slightly more pressure than usual, roughly double the knife weight. Hold a steep angle, about 25 degrees.
Make short, controlled strokes until you grind past the chip. This removes material behind the damage and creates a fresh edge profile.
Check the edge frequently. Stop as soon as the chip is gone. Then reset your angle back to 15-20 degrees and resharpen normally on the medium and fine grits.
When to avoid blade repair
If the chip is deeper than about 1 mm, you risk removing too much metal. The knife may become too thin behind the edge and break during use. For deep chips, consider a professional sharpening service or replacing the knife.
Preventing future damage
Keep your knives away from bones, frozen food, and glass cutting boards. A single hard impact can roll an edge. A rolled edge will gouge your water stone on the next sharpening.
Regular honing between sharpenings also keeps the edge aligned and less prone to catching.
Mistakes That Make Gouging Worse (And How to Avoid Them)
Even after fixing the four main causes, certain habits can undo your progress. Here are the most common mistakes we see in user reports and workshop settings.
Skipping the flattening check
Many sharpeners flatten their stone once and assume it stays flat. Water stones dish faster than you think. A stone used for ten minutes can develop a visible curve.
Check flatness before every session. It takes ten seconds and saves you twenty minutes of frustration.
Changing angle mid-stroke
If you raise or lower your wrist during a pass, the edge transitions from one angle to another. That transition point digs into the stone. Keep your wrist locked.
Move your whole arm from the shoulder, not just your hand. Practice on a dry stone until the motion feels locked in.
Using a dry or poorly soaked stone
A dry stone grabs the blade instead of letting it glide. Follow the manufacturer soak time. For most Japanese water stones, that is 5 to 15 minutes.
For splash-and-go stones, spray the surface enough to keep a thin film of water. A dry spot creates friction, and friction leads to gouging.
Forgetting to deburr
After you sharpen, a burr forms on the edge. If you do not remove it, that burr can roll over and catch the stone during the next sharpening session. Use a leather strop or a fine stone to remove the burr.
A clean edge glides; a burred edge gouges.
Using the wrong grit progression
Jumping from a coarse stone directly to a fine one leaves deep scratches. Those scratches create irregular contact points that let the edge dig in. Always follow a logical progression: coarse, medium, fine.
Skip no more than one grit level at a time.
When to Replace Your Stone vs. When to Stick With It
Water stones are consumables. They wear down over time. But how do you know when to stop trying to fix a gouging problem and just buy a new stone?
Signs you should replace your stone
- Thickness below 4-5 mm: A thin stone is prone to dishing faster than you can flatten it. It also lacks the mass to hold water and slurry. Replace it.
- Cracks or chips in the stone: A cracked stone can break under pressure. The crack edges will catch your blade and cause gouging. Discard it.
- Uneven wear that cannot be flattened: If you have to remove more than 2 mm of material to get a flat surface, you are wasting stone life. Replacement is cheaper than the time you will spend chasing flatness.
- Permanent loading: Some stones absorb metal particles that clog the pores. If soaking and cleaning with a nagura stone does not restore cutting action, the stone is spent.
Signs you can keep your stone
- Minor dishing corrected by flattening: A dish less than 1 mm deep is easily fixed with a lapping plate. This is normal wear.
- Stone still has at least 6-8 mm of thickness: Plenty of life left. Keep flattening and using it.
- Surface glazed but not damaged: A glaze can be removed with a nagura stone or by rubbing with wet-dry sandpaper. The stone is fine.
How long should a water stone last?
That depends on usage frequency and grit. A coarse stone used weekly may last 6 to 12 months. A fine stone used the same way can last 2 to 3 years.
Manufacturer specs (from brands like Shapton, Naniwa, and Suehiro) estimate 50 to 100 sharpenings per stone on average.
Cost perspective
A good water stone costs 30 to 60 dollars. A diamond lapping plate costs about 40 to 80 dollars. If you are flattening a stone that is nearly gone, you are better off buying a replacement.
The lapping plate is a one-time purchase that extends the life of every stone you own.
Frequently Asked Questions
Why does my blade only gouge on one side of the stone?
You are likely holding the knife at a different angle on each side. The side you are less comfortable with may be steeper. Check your angle consistency using an angle guide.
A ten-degree difference between sides is enough to cause gouging on the steeper side.
Can I use oil instead of water on a water stone?
No. Water stones are designed for water. Oil clogs the pores and ruins the cutting action.
If you want an oil stone, buy one made for oil. Using oil on a water stone will cause the blade to skid rather than cut, which can increase gouging.
How do I clean metal buildup off my water stone?
Use a nagura stone or a fine-grit diamond plate. Rub it across the wet stone in a circular motion. The slurry will lift embedded metal particles.
Rinse thoroughly. If that does not work, try a soft eraser block designed for sharpening stones.
Is it normal for a new water stone to dish quickly?
Some new stones dish faster during the first few uses as the surface settles. That is normal. Flatten it after the first two or three sessions.
After that, the wear rate should stabilize. If it continues to dish rapidly, the stone may be too soft for your blade steel, and you should consider a harder stone.
Can I fix a deep gouge in my water stone?
Yes, but only if the gouge is shallow enough to flatten out. Use a coarse diamond lapping plate and remove material until the gouge disappears. If the gouge is deeper than 1 mm, you may lose too much stone thickness.
In that case, replace the stone.
Should I use a knife sharpening guide for beginners?
A guide helps you maintain a consistent angle. It is especially useful if you are new to freehand sharpening. Once you build muscle memory, you can wean off it.
Many experienced sharpeners use a guide for their first few months and then switch to freehand. The consistency of an angle guide reduces gouging by keeping the edge at the same angle throughout the stroke.

Related posts
Can You Use Dish Soap on Cast Iron? Dishwasher Risks
Let’s answer the question everyone argues about: can you put washing cast iron with harsh dish soap or…

What Temp & Time for Crispy Golden Cast Iron Cornbread?
You're staring at a cold cast iron skillet, wondering what temperature and cooking time for crispy golden skillet…

Remove Rust and Restore Seasoning on Cast Iron
Searching for how to clean cast iron skillet and remove rust spots and stripped seasoning patches on cast…