Can Cheap Mixer Handle Heavy Bagel Dough Without Stripping
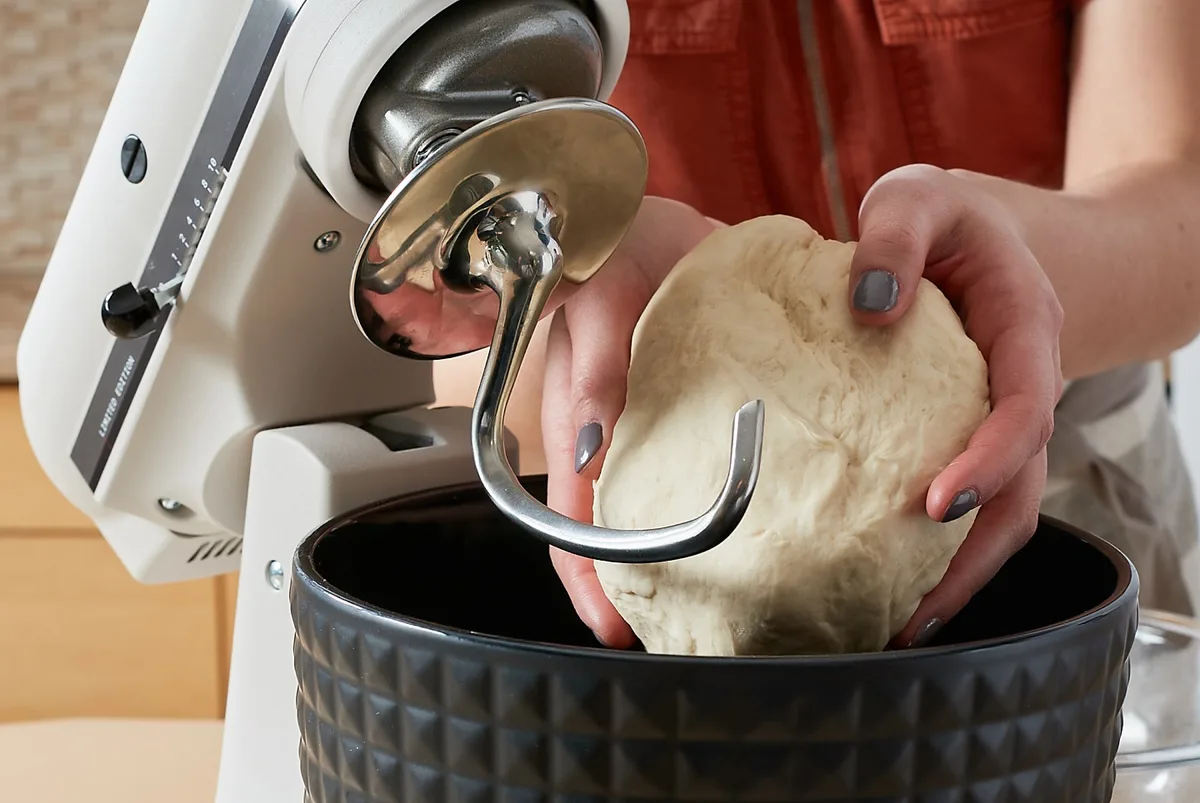
So, can you put kneading heavy bagel dough causing plastic gears to strip in a budget stand mixer under 100 safely? The honest answer is: it's risky, but doable if you know the limits and follow a careful workflow.
Manufacturer specifications for most sub-$100 mixers list a maximum flour capacity of 400 to 450 grams for dough mixing. Bagel dough is one of the stiffest doughs you can make, with a hydration of 55, 60 percent. Push past that limit and the plastic gear inside becomes the weak link.
Let's break down exactly what's happening under the hood.
Image source: Web (Bing) / recipes.net (Web image (fair-use with source credit))
Quick Answer
Yes, you can knead bagel dough in a budget mixer. But strict limits apply. Keep flour under 400 grams.
Use the lowest speed only. Stop every two minutes. Finish kneading by hand for the last minute.
Replace a stripped gear for under $15 if it fails.
The Real Problem: Why Bagel Dough Destroys Budget Mixer Gears
Bagel dough is unusually stiff. High protein flour (12, 14 percent) absorbs less water than all-purpose flour, creating a dense, elastic mass. That stiffness translates directly into torque, the twisting force your mixer's motor has to fight.
Inside a budget stand mixer, that torque passes through a set of gears. On units priced under $100, those gears are almost always made from plastic, typically glass-filled nylon or acetal. These materials are strong enough for light doughs (cookies, pancakes, whipped cream) but have a yield strength around 7,000 to 9,000 psi.
When the dough resists the hook, the gear teeth experience shear forces that can exceed that limit.
If you run a stiff dough for more than a few minutes, the gear teeth begin to deform. First you might hear a clicking sound. Then the hook stops turning while the motor still runs.
That's gear stripping, the teeth have sheared off or the shaft has slipped inside the gear hub.
The problem isn't just the gear material. It's also the motor's inability to deliver steady torque without overheating. Most budget mixers use universal motors rated around 250 to 400 watts.
When the motor can't turn the hook, it stalls or draws excessive current, which generates heat. Heat weakens plastic gears even further. It's a vicious cycle.
Manufacturers know this. That's why many use a plastic gear as a deliberate "sacrificial fuse", it fails before the motor burns out. But that doesn't help you when you're halfway through a bagel batch.
The worst part? Many first-time bagel makers don't realize their mixer has plastic gears until it's too late. They follow a recipe designed for a heavy-duty mixer and end up with a broken appliance.
What’s Inside Your 0 Mixer (and Why That Plastic Gear Matters)
Open the housing of a typical Hamilton Beach, Oster, Dash, or Cuisinart CHEF model under $100 and you'll find a simple drive system. The motor shaft connects to a small pinion gear, which drives a larger plastic gear that turns the dough hook shaft.
That plastic gear is the critical component. It's usually made from nylon 6/6, acetal (POM), or glass-reinforced nylon. These materials are cheap to mold, quiet in operation, and light enough to keep the mixer portable.
But they have limitations.
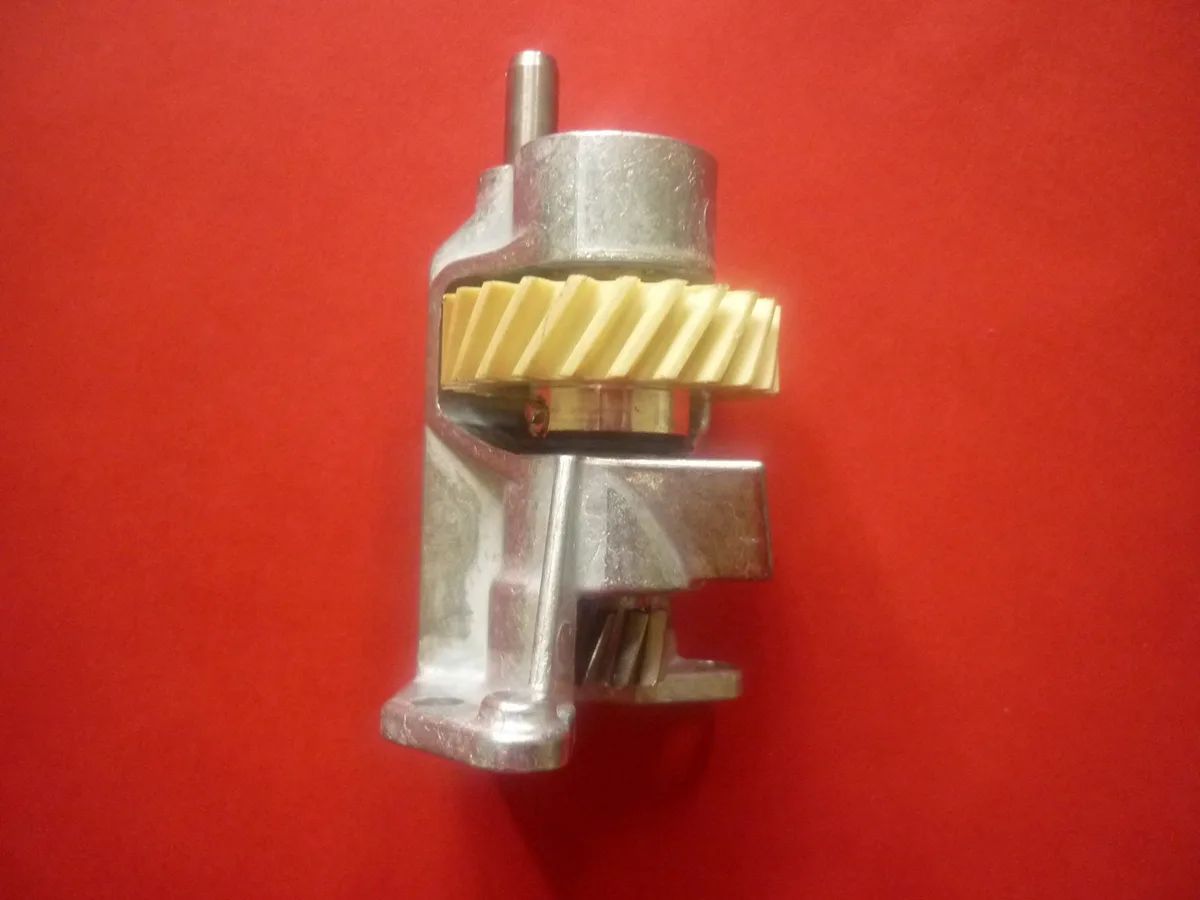
Image source: Web (Bing) / elliselectricals.com.au (Web image (fair-use with source credit))
Here's how the plastic gear compares to the metal gears found in mixers costing $200 or more:
| Feature | Plastic Gear (budget mixers) | Metal Gear (premium mixers) |
|---|---|---|
| Material | Nylon or acetal | Steel or zinc alloy |
| Cost to replace | $5–$15 | $30–$80+ |
| Durability under heavy dough | Low – strips under high torque | High – handles repeated stiff dough |
| Noise | Quiet | Louder (metal-on-metal) |
| Acts as fuse? | Yes – breaks to protect motor | No – motor or transmission fails first |
| Typical lifespan with bagel dough | 1–5 batches (if misused) | Hundreds of batches |
The plastic gear isn't all bad. It keeps the mixer affordable and lightweight. It also prevents a more expensive failure, if the gear bound up, the motor might overheat and catch fire.
Underwriters Laboratories (UL) standards require small appliances to fail safely. The plastic gear helps meet that requirement.
But here's the trade-off: the gear is engineered to fail at a specific torque threshold. Heavy bagel dough exceeds that threshold regularly.
You can check if your model has a plastic gear by looking up the parts diagram online. Most manufacturers publish exploded views of the gearbox. If the gear appears white, beige, or black plastic (not silver metal), it's a plastic gear.
If it's brass or steel, you're in better shape, but you won't find metal gears in any sub-$100 stand mixer sold as of 2026.
The Honest Answer: Yes, But Only Under These Conditions
You can knead bagel dough in a budget mixer without stripping the gear. But it requires strict adherence to these conditions:
- Flour weight must stay under 400 grams (about 3.5 cups). This yields roughly 6 to 8 bagels. Anything larger and the torque climbs too high.
- Dough hydration must be 58 percent or higher. Drier dough (55% or below) is exponentially stiffer. If your recipe calls for 55% hydration, add a tablespoon of water to bring it up.
- Use the lowest speed setting only. Speed 2 or higher puts more impact load on the gear teeth during the "slap" phase of kneading.
- Knead in short bursts. Run the mixer for 2 minutes, then stop and let it rest for 1 minute. This allows the gear to cool and the motor to recover. Never run continuous duty beyond 5 total minutes of kneading.
- Finish kneading by hand. After the machine has done the initial mix, turn the dough out onto a board and knead for 1 to 2 minutes by hand. This final step builds gluten without stressing the gear.
- Use an autolyse. Rest the flour and water for 20 to 30 minutes before kneading. This hydrates the flour naturally, reducing the initial resistance and cutting kneading time by up to 40 percent.
- Avoid doubling recipes. Never scale a bagel recipe to use 800 grams of flour in a budget mixer. The gear will fail on the first batch.
If you follow all those conditions, your plastic gear can last for dozens of batches. Ignore any one of them, and you're gambling.
Your Decision Tree: Can You Safely Make Bagels? (Step-by-Step Branches)
Let's walk through the decision tree so you can assess your specific situation.
Branch 1: What mixer do you own?
- If it's a sub-$100 model like a Hamilton Beach 64650, Oster 2622, Dash Everyday, or Cuisinart CHEF, assume plastic gears.
- If it's a used KitchenAid Artisan or Pro model bought for under $100, check the gear material. Most have metal gears, but older tilt-head models may have plastic worm gears. Verify using the model number.
Branch 2: What recipe are you using?
- If the flour amount is 400 grams or less, proceed.
- If it's more than 400 grams, split the batch or switch to hand kneading.
Branch 3: What is your dough hydration?
- If hydration is 58% or higher (e.g., 320g water to 500g flour), you're in the safe zone.
- If hydration is below 58%, add water to reach 58% or prepare to hand knead the whole batch.
Branch 4: Can you commit to short bursts?
- If you're willing to babysit the mixer and stop every 2 minutes, go ahead.
- If you need to walk away while it kneads, don't use the mixer. Hand knead instead.
Branch 5: Are you prepared to hand-finish?
- Yes? Great. Plan to transfer the dough to a board after 4 to 5 minutes of machine time and knead for 1, 2 minutes.
- No? Then your gear will likely strip within 10 to 20 batches.
Final decision:
- If you answered "yes" to all branches above, you can safely make bagels with your budget mixer.
- If you answered "no" to any branch, change your approach or choose an alternative method.
How to Knead Heavy Dough Without Stripping Gears (The Workflow)
Here's the exact step-by-step process our research suggests for a safe bagel batch using a sub-$100 mixer.
Weigh your ingredients. Use a digital scale. Measure exactly 380 grams of bread flour (12.5, 14% protein) and 220 grams of water (58% hydration). Add 10 grams of salt and 5 grams of instant yeast. Never exceed 400 grams of flour.
Autolyse the flour and water. Combine the flour and water in the mixer bowl. Mix gently with a spatula until no dry flour remains. Cover and let sit for 20 minutes. This pre-hydrates the flour, reducing gluten development time and lowering initial torque.
Add yeast and salt. Sprinkle the yeast and salt over the autolysed dough. Attach the dough hook.
Knead on speed 1 only. Turn the mixer to the lowest speed setting. Let it run for exactly 2 minutes. The dough should come together into a rough ball.
Stop and rest. Turn off the mixer. Let the motor and gear cool for 1 full minute. Do not skip this step even if the dough looks okay.
Knead for another 2 minutes. Run the mixer again on speed 1 for 2 more minutes. The dough should become smoother and slightly elastic.
Check the dough. At this point, the dough should pass the windowpane test (stretch a small piece thin enough to see light through without tearing). If it doesn't, hand knead for 1, 2 minutes instead of running the mixer again.
Transfer and finish by hand. Turn the dough onto a lightly floured surface. Knead by hand for 1 to 2 minutes until smooth and elastic. This final step builds gluten without any risk to the gear.
Shape and proof. Divide the dough into 6 equal pieces. Shape into bagels and let proof according to your recipe.
Clean the mixer. Remove the dough hook and wash it immediately. Let the mixer cool completely before storing or using again.
This workflow keeps total machine kneading time to 4 minutes, well within the safe duty cycle of most budget mixers. The autolyse and hand-finishing steps are the secret to making it work reliably.
Common Mistakes That Kill Your Gears Fast
Even with good intentions, a few common errors can turn your budget mixer into a paperweight. Here are the ones our research flags most often.
Running the mixer on speed 2 or higher. That extra speed increases the impact force on the gear teeth during each rotation. The dough hook slaps against the stiff dough, and the plastic gear absorbs the shock. Stick to speed 1.
Always.
Letting the mixer run continuously. A budget mixer is not designed for 8 minutes of non-stop kneading. The motor heats up. The plastic gear softens.
Teeth begin to deform. Set a timer for 2 minutes and stop.
Adding more flour to stiffen the dough mid-cycle. A common instinct is to add flour if the dough looks sticky. But stiffening the dough mid-knead spikes the torque instantly. If you must adjust hydration, add water instead.
Ignoring the smell of overheated plastic. That faint burnt odor is a clear warning. The gear is heating beyond its safe operating temperature. Stop immediately and let the mixer cool for 15 minutes before assessing the damage.
Using the dough hook for mixing thick batters. Cookie dough and bagel dough are not the same. Cookie dough has fat and sugar that lubricate the movement. Bagel dough has none.
Reserve the dough hook for bread and bagel dough only.
Doubling the recipe without checking the gear limit. We mentioned this earlier, but it bears repeating. An 800-gram flour batch generates roughly twice the torque of a 400-gram batch. The gear will strip within the first minute of kneading.
Forgetting to clean the gear housing. Flour dust and dough residue can work their way into the gearbox over time. That grit acts as an abrasive on the nylon gear teeth. A simple wipe-down after each use helps prolong gear life.

Image source: Web (Bing) / pinterest.com (Web image (fair-use with source credit))
If you've already stripped a gear, don't toss the mixer. Replacement gears cost $5 to $15 and are widely available online. Many models require just a screwdriver and 20 minutes to swap.
Treat it as a learning experience and adjust your technique going forward.
When to Walk Away: Better Alternatives for Bagel Bakers
Not everyone wants to babysit a mixer or hand-finish dough. If the workflow described earlier feels like too much hassle, you have better options. Here's how to decide.
Option 1: Hand kneading (free, always available). Bagel dough requires about 8 to 10 minutes of hand kneading. It's a workout, but it costs nothing and carries zero equipment risk. If you bake bagels only once a month, this is the most practical choice.
Option 2: Use a bread machine on the dough cycle. Bread machines knead gently and have metal gears or belt drives that handle stiff doughs well. Most can handle 400 to 500 grams of flour. The downside is the shape limitation, you still need to shape bagels by hand after the cycle finishes.
But the machine does the heavy work safely.
Option 3: Hunt for a used premium mixer. A secondhand KitchenAid Artisan or Pro model from the mid-2000s can often be found for $80 to $120. These mixers have metal gears (brass or steel) that handle bagel dough easily. Check for wobbling head, noise, or oil leaks before buying.
A used premium mixer is a better long-term investment than a new budget model, especially if you plan to bake regularly. For comparison, air fryer cleaning and maintenance routines follow a similar logic, keeping a quality tool in good shape pays off over time (see our guide on how to clean your Hamilton Beach air fryer for a parallel example).
Option 4: Stick to soft dough recipes. If your heart isn't set on bagels, budget mixers excel at brioche, dinner rolls, pizza dough (at 65% hydration), and focaccia. These doughs generate much less torque and won't threaten the plastic gear. Save the bagels for hand kneading or a future mixer upgrade.
Option 5: Split the batch and knead twice. If you insist on using the budget mixer, divide the recipe in half. Knead one half, then the other. This doubles your time but keeps the torque within safe limits.
Decision point: If you bake bagels more than once a month, invest in a used premium mixer or commit to hand kneading. If it's an occasional project, the budget mixer with the strict workflow is fine.
FAQs: Quick Answers to Common Questions
How do I know if my mixer has plastic gears?
Look up the parts diagram for your model number online. If the main drive gear appears white, beige, or black plastic, it's nylon or acetal. Brass or silver metal means metal gears.
Most sub-$100 models use plastic.
Can I replace a stripped plastic gear myself?
Yes. Replacement gears cost $5 to $15 and are available on appliance parts sites. You need a screwdriver and about 20 minutes.
Watch a teardown video for your specific model. It's a straightforward repair.
What is the maximum flour weight for bagel dough in a budget mixer?
Keep it under 400 grams (about 3.5 cups). That yields 6 to 8 bagels. Exceeding this dramatically increases the risk of gear stripping.
Always weigh your flour with a digital scale for accuracy.
Is there a way to strengthen the plastic gear?
No. Heat treatment or aftermarket metal gears are not available for most budget models. The gear is engineered as a sacrificial part.
Your only options are to reduce the load or hand knead.
What should I do if I smell burning plastic during kneading?
Stop immediately. Unplug the mixer. Let it cool for 15 minutes.
Check the gear by turning the dough hook by hand. If it spins freely while the motor is off, the gear has likely stripped. Do not restart until you inspect the gear.
Does adding oil to the dough help protect the gear?
Not significantly. Oil reduces gluten development slightly, which can lower resistance, but the effect is minimal. The real solution is reducing batch size and using short kneading intervals.
Final Verdict: Should You Try It or Not?
Here's the bottom line from our research.
If you bake bagels occasionally and are willing to follow the strict workflow (under 400g flour, speed 1, short bursts, hand-finish), a budget stand mixer under $100 can technically handle the job. The risk is manageable, and the reward is fresh bagels without buying a new appliance.
If you want a hands-off experience, bake large batches, or expect the mixer to last for years of weekly bagel making, don't do it. The plastic gear is a ticking clock. It will fail eventually.
Either hand knead or invest in a mixer with metal gears.
For most home bagel bakers, the best path is a hybrid approach. Use the budget mixer for the initial mix and autolyse. Finish by hand.
This gives you the speed of automation and the safety of manual control. It's not glamorous, but it works.
And if you do strip a gear, don't panic. It's a $15 fix and a lesson learned. Properly maintained, even a budget mixer can serve you well for years on softer doughs.
Just know its limits and respect the plastic gear inside.

Related posts
Can You Use Dish Soap on Cast Iron? Dishwasher Risks
Let’s answer the question everyone argues about: can you put washing cast iron with harsh dish soap or…

What Temp & Time for Crispy Golden Cast Iron Cornbread?
You're staring at a cold cast iron skillet, wondering what temperature and cooking time for crispy golden skillet…

Remove Rust and Restore Seasoning on Cast Iron
Searching for how to clean cast iron skillet and remove rust spots and stripped seasoning patches on cast…