Fix Commercial Dual Basket Fryer High-Limit Reset Button
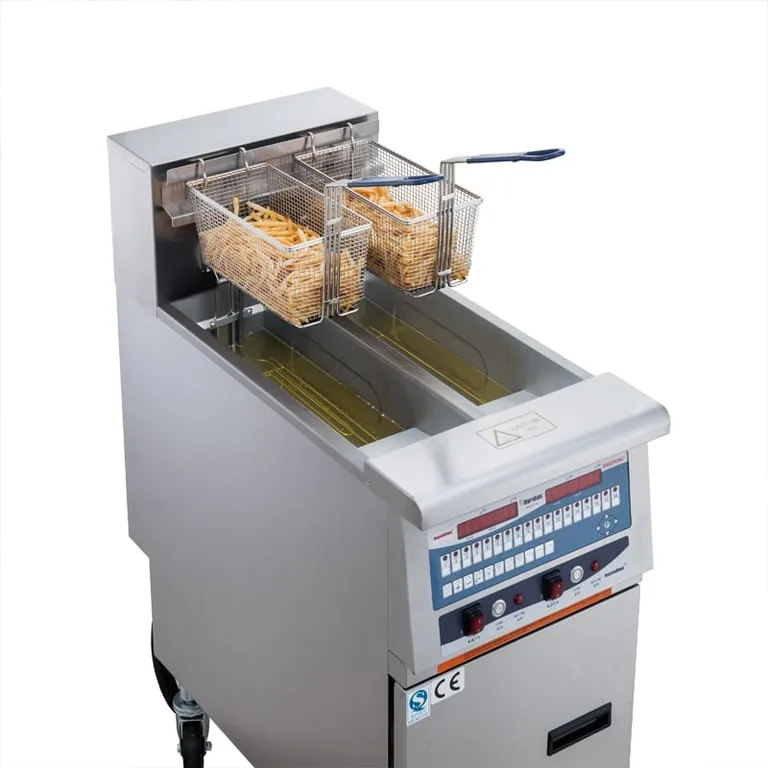
That little red reset button is the most frustrating button in a commercial kitchen. If you're trying to figure out how to fix commercial style dual basket deep fryer fryer tripping high-limit safety reset button, you already know the drill. You press it, the element heats, and minutes later it pops again.
This isn't random. The switch is telling you something real.
This is not a press-and-pray repair. As of 2026, most commercial electric fryers use a manual-reset high-limit switch rated to open around 400°F to 450°F, and UL 197 sets the safety standard for this equipment. If you reset without diagnosing, you risk a fire.
Let's fix this the right way.
Quick Answer
Start with a full cool-down. Then test the heating element, thermostat, and high-limit switch with a multimeter. Replace any failed part.
Confirm the fryer is on a dedicated circuit. Never reset repeatedly until you've found the root cause.
Image source: Web (Bing) / chefmaxequipment.com (Web image (fair-use with source credit))
Why This Reset Button Keeps Tripping (And Why You Can’t Just Keep Pressing It)
When the high-limit button pops, the safety system just did exactly what it was built to do. It opened the circuit because the temperature at the probe passed its factory threshold. On commercial fryers, that threshold is usually 400°F to 450°F.
Think of the switch as a circuit breaker for heat.
Even small home fryers share the same basic high-limit design. The difference is scale. A commercial dual-basket unit pushes many more watts through a bigger element and a bigger vat, so the consequences are bigger too.
In our research across service manuals and equipment reviews, the trip causes come down to a short list:
- Low oil level. The element pokes above the oil line, overheats, and trips the button.
- Food debris or old oil. Carbon on the probe insulates it, so it reads cooler than the oil really is.
- Failed heating element. A crack in the insulation can create a ground fault or a dead short.
- Bad thermostat. It keeps the element on past your set temperature.
- **Fault – Faulty high-limit switch itself. The switch can fail shut or fail open. If it fails shut, the fryer never trips. If it fails open, it trips constantly.
– Circuit breaker or wiring issue. Undersized wire, a loose neutral, or a weak breaker can cause voltage drop, which makes the element draw more amperage and overheat.
Here's the hard truth. Every time you push that reset button without addressing the real problem, you send that high-limit switch through another thermal cycle. These switches are rated for a finite number of cycles.
Somewhere between 10 and 30 resets, the bimetal disc inside loses its temper. Then it trips at a lower temperature. Then it trips at any temperature.
Then it stops resetting altogether.
The button is not the problem. It is a symptom. Treat it like one.
How the High-Limit Safety Switch Actually Works
You need to understand what is inside that little metal housing. Because the fix depends on knowing which part does what.
What the High-Limit Does
The high-limit switch is a backup safety device. It sits electrically between the thermostat and the heating element. Its job is one thing: kill power if the temperature ever passes a preset danger threshold.
Inside the switch is a bimetal disc. When heated past its rated temperature, the disc snaps into a different shape. That action mechanically opens the electrical contacts.
Most commercial fryers use a manual-reset design. That means once the disc snaps, it stays open. No current flows until a human physically presses the reset button to force the disc back.
This is why you can't wire around it or bypass it. The switch is built to fail open. If the wiring ever shorts out around it, high current should still blow the circuit breaker.
But do not test that theory.
What the Operating Thermostat Does
The operating thermostat is a different device entirely. It controls the temperature during normal cooking. You set it to 350°F for fries.
The thermostat cycles the element on and off to hold that temperature.
The thermostat lives on the same circuit, but it acts independently from the high-limit switch. One common failure mode looks like this: the thermostat's contacts weld shut, so the element runs full power continuously. The oil climbs well past 350°F.
The high-limit switch eventually trips at 425°F. The cook sees a tripped reset button and assumes the high-limit is bad. But the real fault is the welded thermostat contacts.
This is the most misdiagnosed problem in dual-basket fryers.
Why They Are Not the Same Thing
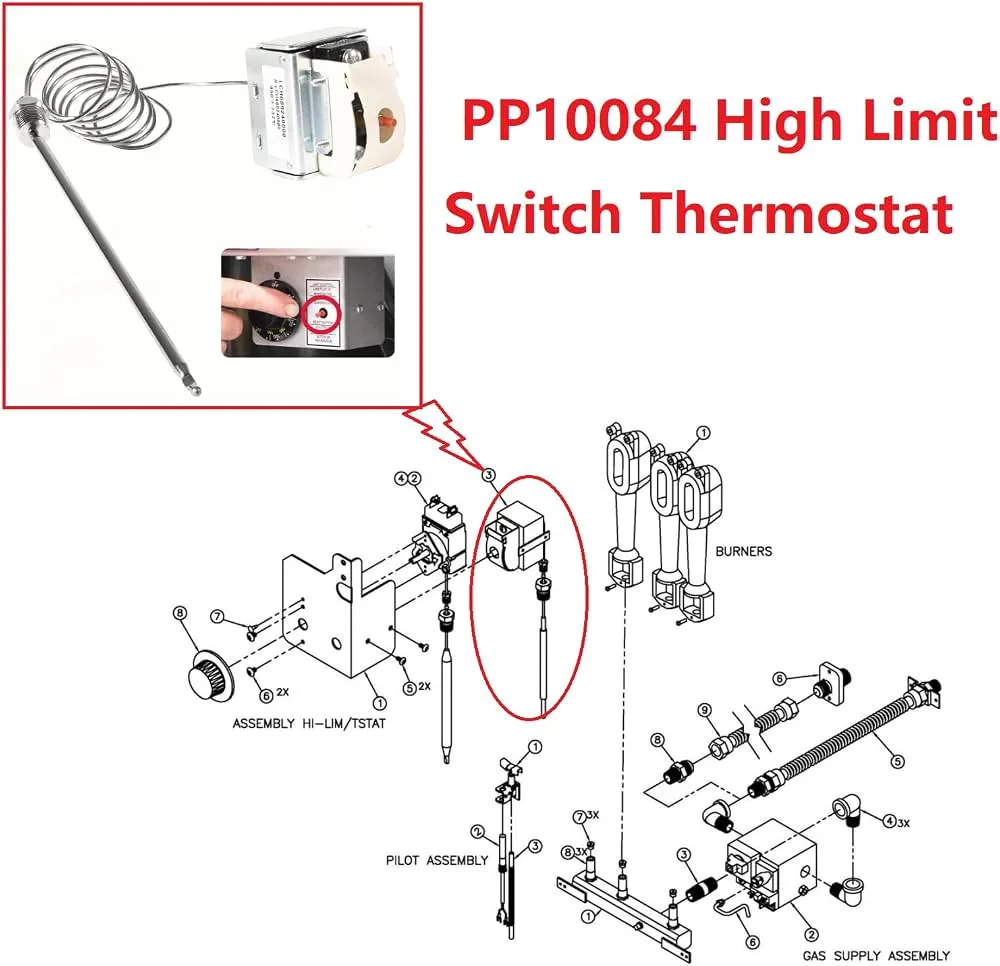
Image source: Bing (Web (fair-use with source credit))
The simplest way to tell them apart is by looking at the wiring diagram inside the fryer access panel. The high-limit is always wired in series with the element, usually with a red or blue wire marking. The thermostat is wired in series too, but it includes a separate sensor probe that extends into the oil.
The high-limit switch has a manual reset button. The thermostat has a dial or knob. If you push the reset button and elements come on, the high-limit is working.
If elements stay off after a reset, you might have a dead high-limit, a blown element, or a tripped breaker.
Start with the breaker. Always.
NFPA 96 requires that commercial cooking equipment, including deep fryers, have operating and safety controls that are maintained per manufacturer specs. Ignoring a repeated trip violates fire code in most jurisdictions, and it increases your insurance liability.
Critical Safety First: Before You Touch Anything
Let's be blunt about this. A commercial fryer is a machine that runs on high voltage and sits next to open oil at 350°F. You need to treat it with real respect.
Lockout / Tagout Basics
This is not optional. A lockout/tagout (LOTO) procedure means you physically disconnect the unit from its power source and you put a lock on it so nobody can flip it back on while you are working.
For a cord-and-plug fryer, this means unplugging it and zip-tying the plug so no one else can plug it back in. For a hardwired unit, you need to throw the breaker and put a lockout device on it. A simple padlock with a hasp works.
If you work in a kitchen with multiple shifts, tell the other cooks what you are doing. Hang a sign on the fryer. "DO NOT USE.
REPAIR IN PROGRESS." Treat every live wire as if it is still energized until you prove it is not with a multimeter.
Minimum Safe Cooldown Time
Hot oil burns are among the worst injuries in professional kitchens. The oil not only holds heat, but it also sticks to the skin.
The minimum cooldown time for a dual-basket fryer is 30 minutes after the last cooking cycle. For a full vat of oil, 45 minutes is safer. The oil will still be warm to the touch, but it will not flash-boil or spatter when you start working on the interior.
If you need to drain the oil to access the element, wait until it is below 150°F. Check with an infrared thermometer at the oil surface.
Visual Inspection for Obvious Damage
Before you touch a single wire, do a visual check. Look for:
- Cracked or frayed power cord. This is the most common cause of ground faults in fryers that get moved around daily.
- Oil residue around the electrical control box. Oil creeping into the wiring compartment is a major problem.
- Burned or melted wire insulation. This tells you exactly where the heat was highest.
- Corrosion on terminals. Common in kitchens with high humidity.
- Debris on the high-limit probe. Carbon buildup can prevent the probe from reading correctly.
If you see any of these, address them before you proceed with electrical testing. Sometimes the fix is cleaning off carbon and replacing a bad wire nut.
How to Diagnose the Root Cause
Now you are ready to start diagnosing. You need a multimeter, a screwdriver set, and about 20 minutes of uninterrupted time. Follow these steps in order.
Do not skip Step 3 because it is the most common hidden problem.
Step 1 – Check the Obvious Stuff (Oil Level, Debris, Foam)
Start with the easy things because they cost nothing to fix.
Check the oil level. Every dual-basket fryer has a minimum oil line stamped inside the vat. If the oil is below that line, the upper portion of the heating element is uncovered.
That portion runs hot, heats the oil unevenly, and causes the high-limit to trip. Top off to the fill line with fresh oil.
Check for food debris. Pull the baskets, skim the oil surface, and look for heavy carbon buildup on the element coils. If you see chunks of batter or breading stuck to the elements, they act as insulation.
They trap heat on the element surface and force the high-limit to open.
Check for oil foaming. If the oil is old, waterlogged, or breaking down from heat cycling, it can foam during cooking. Foam rises above the oil line and makes direct contact with the high-limit probe.
That rapid temperature spike trips the high-limit immediately. The fix is filtering or replacing the oil.
If all three of these checks pass, move on to Step 2.
Step 2 – Check Voltage and Circuit Breaker at the Wall
Commercial dual-basket fryers pull a lot of current. A 240V unit with two 9kW elements draws 75 amps at full load. That means it needs a 100-amp breaker and 3AWG copper wire in most installations.
Take your multimeter and set it to AC voltage. Test the receptacle or the breaker terminals. For a 240V unit, you should read 208V to 240V between the hot legs.
For a 120V unit, ground to hot should read 115V to 125V.
If the voltage reads low (below 205V on a 240V circuit), the element draws more amperage to compensate. That extra current heats the element past its design limits and trips the high-limit. Low voltage is often caused by a loose neutral in the panel or an undersized feeder wire.
Circuit breakers weaken over time. A breaker that trips frequently may not hold its rating anymore. If the breaker feels warm to the touch, replace it.
Step 3 – Test the Heating Element with a Multimeter
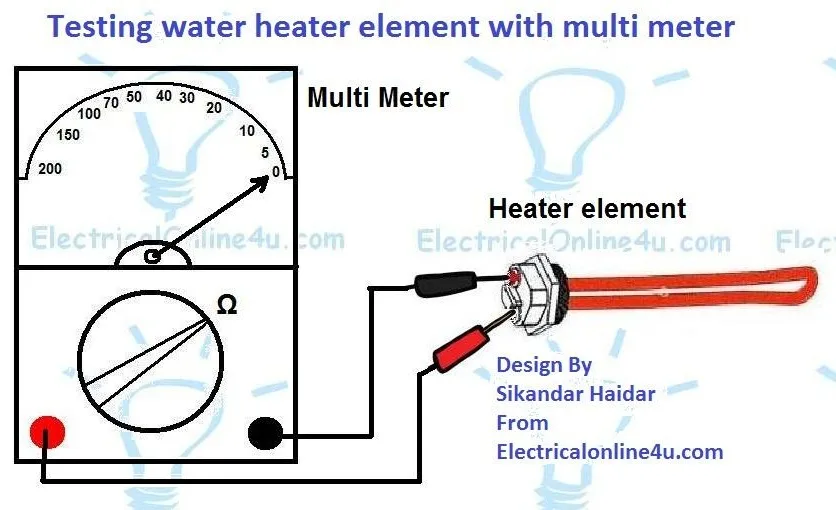
Image source: Web (Bing) / storage.googleapis.com (Web image (fair-use with source credit))
The heating element is the most common hidden cause of high-limit trips. A failed element can short to ground or develop a hot spot that triggers the high-limit before the thermostat can respond.
Disconnect the element wires at the junction block. Set your multimeter to resistance (ohms). Touch one lead to each element terminal.
A good element should read between 10 and 50 ohms, depending on the wattage rating. A reading of infinity (open line) means the element is burned out. A reading of zero or near zero means the element is shorted.
Then test for ground faults. Set the multimeter to continuity. Touch one lead to either element terminal and the other lead to the metal body of the fryer.
You should get no continuity. If the meter beeps or shows a low resistance reading, the element has a ground fault. Replace it immediately.
A ground fault on the element is dangerous. It can energize the entire fryer chassis, putting staff at risk of shock. If you have a GFCI breaker on the circuit, it should trip immediately when the element energizes.
Not all commercial kitchens use GFCI breakers.
Step 4 – Test the High-Limit Switch Itself
After you have confirmed the element is good, test the high-limit switch. Locate the two wire terminals on the switch. With the fryer unplugged and fully cool, set your multimeter to continuity.
Touch one lead to each terminal. You should hear a beep indicating continuity. The switch should be closed at room temperature.
If you get no continuity, the bimetal disc is stuck open or the switch has failed. Replace the high-limit switch.
Do not try to bend the disc back into shape. It is precision-calibrated and you will not get it right. A new switch costs $15 to $30 and takes about 10 minutes to install.
Step 5 – Check the Thermostat Calibration
This step is the hardest to diagnose without a thermometer and a controlled test. The thermostat might be cycling the element on and off at the correct temperature but not shutting off before the high-limit kicks in.
The best test is to fill the fryer with fresh oil and heat it to a set temperature like 350°F. Use an oil thermometer separate from the fryer's built-in gauge. Watch the element cycle.
It should cycle on for about 30 seconds, then off for about 30 seconds to hold temperature. If the element stays on for minutes at a time while the oil climbs past 400°F, the thermostat contacts are welded shut.
Replace the thermostat if this is the case. Thermostats for commercial dual-basket fryers range from $40 to $80 depending on the brand.
When to Replace Parts vs. Call a Pro
Now that you have the diagnosis, you need to decide what you can do yourself and what needs a licensed electrician.
Parts You Can Safely Swap Yourself
If you are comfortable with basic hand tools and following a wiring diagram, you can replace these parts:
- High-limit switch. Two wires, two screws, one bracket. Label the wires before you remove them.
- Heating element. Requires unlatching the element bracket and removing the retaining screws. You need to drain the oil fully first.
- Thermostat. The probe and the wiring block mount independently. Mark each wire.
- Power cord. Typically a 4-wire or 3-wire NEMA plug. Match the gauge.
- Circuit breaker. Only if you are comfortable in the panel.
Most manufacturer manuals include an exploded parts diagram. Check the manual online before you buy parts. You can also check a unit with similar power ratings, like a countertop model, to see how the parts compare in design.
Signs You Need an Electrician or Service Tech
Some jobs are better left to a qualified technician. Call a pro if:
- The circuit breaker trips immediately after replacement.
- You find burned or melted wiring inside the control box.
- The high-limit switch failed in the closed position (stuck on).
- The fryer is hardwired and the wiring needs to be rerun.
- You are not comfortable using a multimeter or working in a live panel.
A tripped high-limit that resets and then trips again after an hour of use is often a sign of an intermittent ground fault. Those are the hardest to track down and usually require a professional's thermal imaging tools.
The "Three-Strike" Rule for Resetting
Here is a safe threshold for any kitchen. If the high-limit safety reset button trips three times in one shift, stop cooking on that unit. Do not reset it a fourth time.
Something is failing progressively and the fourth trip could cause a fire.
Switch to your backup fryer or use the single basket. Then schedule a proper diagnosis before the next shift. Ignoring this rule is how kitchen fires start.
The NFPA reports that cooking equipment is the leading cause of restaurant fires, and deep fryers are among the highest-risk equipment types.
Tools You'll Need (And How to Use Each One)
You do not need a full electrical toolkit, but you need the right tools to avoid damaging parts or hurting yourself.
List of Tools
| Tool | Purpose | Typical Cost |
|---|---|---|
| Multimeter | Continuity, resistance, voltage tests | $30–$80 |
| Screwdriver set | Phillips and flathead for terminal blocks | $10–$20 |
| Wire stripper/cutter | Clean cuts on wire insulation | $8–$15 |
| Nut driver or socket set | Removing element brackets and retaining nuts | $15–$30 |
| Flashlight or headlamp | Seeing into the wiring compartment | $10–$30 |
| Oil pump or siphon | Draining vat for element access | $10–$25 |
Use the multimeter on the resistance setting for parts testing and on the continuity setting for ground fault checks. The screwdriver set should include a fine-tip flathead for the small terminals on the high-limit switch.
Step-by-Step Repair Guide: Replacing the High-Limit Switch
This is the most common repair on a commercial dual-basket fryer. Follow this in order.
Step 1 – Disconnect Power
Unplug the fryer or throw the breaker and lock it out. Confirm no voltage at the high-limit terminals with your multimeter set to AC voltage. Touch one lead to each terminal.
Zero volts means you are clear.
Step 2 – Access the Control Box
Remove the access panel on the front or side of the fryer. It is usually held on by four screws. Set the panel aside.
Look for the high-limit switch. It is typically a small rectangular box with a red reset button that pokes through the panel.
Step 3 – Remove the Wires
Take a photo of the wiring with your phone. Then label each wire with a piece of tape and a marker. "HT1" and "HT2" works fine.
Loosen the terminal screws with a screwdriver and pull the spade connectors off.
Step 4 – Remove the Mounting Bracket
The high-limit switch clips into a metal bracket. Some use a retaining clip that needs to be pried off with a screwdriver. Others use two small screws.
Remove the bracket and lift the switch out.
Step 5 – Install the New Switch
Slide the new switch into the bracket. Secure the retaining clip or screws. Attach the wires in the same order you removed them.
The orientation does not matter on a standard high-limit because it is a non-polarized switch.
Step 6 – Test Before You Close
Plug the fryer back in. Push the reset button. The element should begin heating.
Let it run for two minutes. If the reset button does not pop, turn the fryer off and replace the access panel.
If it pops again immediately, you have another problem. Go back to Step 3 of the diagnosis section and test the heating element again.
Common Mistakes That Make It Worse
Avoid these errors. They waste time and can cause damage.
Pressing the reset button while the element is still hot. The bimetal disc needs to cool below its rated threshold before it will reset. If you press it hot, nothing happens, and you may burn your finger.
Replacing the high-limit without testing the element. This is the most common mistake. The new switch works fine, but the cracked element trips it again in 15 minutes.
Using a lower-rated high-limit switch as a replacement. Match the current rating (usually 25A or 30A) and the temperature rating (usually 425°F). A switch rated for 375°F will trip constantly.
Letting oil pool inside the control box. If the gasket around the probe is damaged, oil wicks into the wiring compartment. Clean it out and replace the gasket.
Running the fryer with the access panel off. The increased airflow can change how the high-limit reads temperature, causing false trips.
Skipping the cooldown. You cannot diagnose a hot fryer. Hot oil burns are a real risk, and the bimetal disc inside the high-limit resets inconsistently when warm. Give the unit a full 30 to 45 minutes before opening the access panel.
Ignoring a tripped GFCI breaker. A GFCI trips on current leaking to ground, not on overload. That leak means a live wire is touching metal it should not touch. Reset it once to confirm, then hunt for the cause.
Not draining the vat before replacing parts. Unbolting an element with oil in the vat dumps hot oil straight into the wiring compartment. That oil ruins new parts and causes intermittent shorts. Drain the vat whenever a part sits below the oil line.
Running old, degraded oil. Old oil foams when food hits the surface. Foam rises above the oil line and touches the probe directly. If the oil is dark, smells burnt, or smokes at the set temperature, replace it before testing anything else.
Do the diagnosis in the right order and the fix becomes obvious. Test before you replace. Cool the unit before you touch it.
Treat the reset button as the messenger, not the message.
If you are running a smaller countertop unit at home, the same checks apply. Keep the right oil capacity in the tank and weave regular maintenance into your routine. Those two habits prevent most trips before they start.
Frequently Asked Questions
Why does my fryer reset button keep tripping?
The high-limit switch is doing its job. It trips when the oil or element passes a set threshold, usually 400°F to 450°F. Low oil level, a failed heating element, a welded thermostat, or carbon buildup on the probe are the most common causes.
Rarely is the switch itself at fault.
How long should I wait before pressing the reset button?
Wait at least 10 to 15 minutes after the trip. The bimetal disc inside the switch must cool below its rated threshold before it will physically reset. Pressing it early does nothing.
On a hot fryer, waiting 30 to 45 minutes is safer and more reliable.
Can I bypass the high-limit switch?
No. Bypassing the high-limit removes the only backup that stops a runaway fryer from starting a fire. It also violates NFPA 96 and most local fire codes.
If a switch keeps tripping, replace it. If it trips again after replacement, find the real fault.
How do I test a high-limit switch with a multimeter?
Unplug the fryer and disconnect the two wires from the switch. Set the multimeter to continuity mode. Touch one lead to each terminal.
A good switch beeps at room temperature. No beep means the bimetal disc is stuck open and the switch needs replacing.
How much does it cost to fix a fryer that keeps tripping?
A high-limit switch costs $15 to $30. A heating element runs $60 to $150. A thermostat is $40 to $80.
If you hire a service tech, expect $150 to $300 for parts and labor. Most repairs take under an hour once you know the cause.

Related posts

Perfect Crispy Beer-Battered Cod: Temp & Time for Deep Fryer
If you've been searching for what temperature and cooking time for crispy beerbattered cod fish in deep fryer…
Crispy Onion Rings & Funnel Cakes: Dual Fryer Temp & Time
If you've ever searched for what temperature and cooking time for crispy fried onion rings and funnel cakes…
Is Caraway Ceramic Cookware Worth Buying? Reddit
If you have spent any time in cookware subreddits, you have seen the question pop up again and…