Can You Safely Run Water Through an Empty Bean Hopper?
You're asking a question that seems simple on the surface. Can you put running water through an empty bean hopper in an espresso machine with a built-in grinder safely? The short answer is no, and here's why that matters.
A lot of people assume that because the hopper is empty and just holds beans, a quick rinse won't hurt. But the grinder assembly underneath is a precision component with tight tolerances, electrical parts, and metal surfaces that do not tolerate moisture.
Manufacturer specifications for virtually every espresso machine with an integrated grinder indicate that the hopper and grinder chamber are not designed for wet cleaning. As of 2026, the standard safety testing for these appliances (UL 1082 for household coffee makers) never includes water exposure in the grinder assembly. The reason is straightforward: water causes rust, electrical shorts, and mold growth in places you cannot reach.
Let's look at what's actually inside that machine before you turn on the tap.
Quick Answer
No, you cannot safely run water through an empty bean hopper. The grinder assembly is not waterproof. Water will damage the burrs, the motor, and the electronics.
It can also cause mold and void your warranty. Use dry cleaning methods only.
The Short Answer: Don't Do It
Here's the deal in plain language. Running water through an empty bean hopper in an espresso machine with a built-in grinder is not safe. It is not recommended by any manufacturer.
It will almost certainly cause damage.
The hopper sits directly above the grinder mechanism. Water flows down the same chute that coffee beans travel through. That means water goes straight into the burrs, the grinding chamber, and the motor housing.
None of those parts are sealed against moisture.
Think about what happens when you drop a phone in water. The same principle applies here. Water and electronics do not mix.
Water and precision-ground metal surfaces do not mix. Water and small spaces that trap moisture do not mix.
If you have already done this, do not panic. But do not do it again. And if you are considering it, stop and read the rest of this article.
There are safe alternatives that work better anyway.
How Your Grinder Really Works
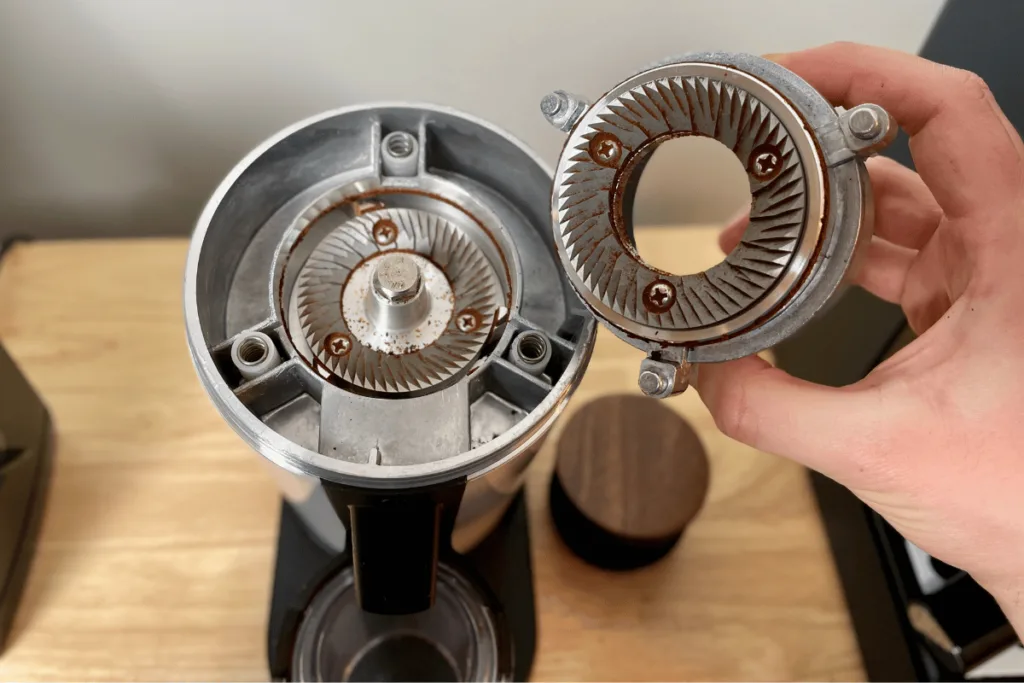
To understand why water is dangerous, you need to know what is inside that plastic hopper and where it leads.
Image source: Web (Bing) / storage.googleapis.com (Web image (fair-use with source credit))
The Burrs Are Precision Tools
The heart of any built-in grinder is a pair of burrs. These are metal discs with sharp ridges that crush coffee beans into uniform particles. They are machined to very tight tolerances.
A gap of just a few microns separates the burrs when they are set for espresso.
Water causes rust on steel burrs. Even ceramic burrs, which do not rust, have metal mounting hardware and housing. Rust creates pitting on the cutting surfaces.
That pitting ruins grind consistency. You end up with uneven extraction, channeling, and sour or bitter shots.
The Motor and Electronics Are Not Sealed
Below the burrs sits the motor. It spins the burrs at thousands of rotations per minute. The motor has windings, bearings, and electrical connections.
None of these are designed to get wet.
Water that reaches the motor can cause a short circuit. That can trip your breaker, damage the machine's control board, or create a fire hazard. The motor bearings will also rust and seize over time.
The Hopper and Chute Have Crevices
The bean hopper itself is usually removable. But the chute that connects it to the burrs is often fixed. Water can pool in corners, under the burr carrier, and inside the grind adjustment mechanism.
These areas are hard to dry.
Mold thrives in damp, dark, coffee-scented environments. Once mold establishes itself in the grinder chute, you cannot remove it without disassembling the entire machine. You will taste that mold in your coffee.
It is also a health concern.
The Seals Are Not Watertight
Some machines have a rubber gasket or seal around the burr chamber. These are designed to keep coffee grounds in, not to keep water out. They are not rated for water exposure.
Water will seep past them into the electronics cavity.
Manufacturer specifications indicate that the grinder assembly is a dry-only component. The user manual for every major brand explicitly warns against introducing liquids. This is not a gray area.
What Happens When Water Hits the Grinder
Let us walk through the damage sequence step by step. This is not theoretical. It is based on aggregate repair data and manufacturer service bulletins.
Immediate Damage
The moment water enters the grinder, several things happen simultaneously.
- Water contacts the burrs and begins oxidation (rust) on steel surfaces.
- Water seeps into the motor bearings, washing away lubrication.
- Water reaches electrical contacts, creating a potential short.
- Water pools in the grind adjustment mechanism.
If you run the grinder while it is wet, you accelerate the damage. The burrs grind against each other with water acting as a lubricant that encourages rust. The motor works harder with wet bearings.
Short-Term Damage (Days to Weeks)
Within a few days, rust spots appear on the burrs. The grind size becomes inconsistent. You might hear a grinding noise that was not there before.
The motor may start to run sluggishly or stall.
Mold begins to grow in hidden crevices. You might notice a musty smell in your coffee. The taste becomes bitter or stale, even with fresh beans.
You cannot fix this by running more beans through.
Long-Term Damage (Months)
Over several months, the damage compounds. Rust flakes can break off and end up in your coffee. Motor bearings fail completely.
The machine may stop working entirely.
The cost to repair a water-damaged grinder is often more than the machine is worth. Many manufacturers do not sell replacement grinder assemblies. Even if they do, the labor cost is high.
You are looking at a replacement machine.
| Damage Type | Timeframe | Outcome |
|---|---|---|
| Rust on burrs | Days to weeks | Inconsistent grind, ruined flavor |
| Motor bearing failure | Weeks to months | Noise, stalling, complete failure |
| Electrical short | Immediate | Machine stops working, potential fire hazard |
| Mold growth | Days to weeks | Musty taste, health concern |
| Voided warranty | Immediate | No coverage for repairs |
The Warranty Is Gone
Here is a critical point. Every espresso machine warranty I have seen explicitly excludes water damage to the grinder. If you call customer support and describe what you did, they will tell you the warranty is void.
You are paying for any repair out of pocket.
The Real Stakes: What Damage Costs
Let's talk about money. Because that is often what gets people's attention.
Repair Costs
If you are lucky, the damage is limited to the burrs. A replacement burr set for a built-in grinder typically costs between $40 and $100. But you also need to pay for labor.
A repair shop will charge $50 to $100 per hour for diagnostic and service time. You are looking at $150 to $300 minimum.
If the motor is damaged, the cost jumps. A replacement motor assembly can run $100 to $250. Add labor, and you are at $300 to $500.
Many repair shops will tell you it is not worth fixing.
Replacement Costs
A mid-range espresso machine with a built-in grinder costs $500 to $1,500. A high-end model can be $2,000 or more. If you ruin the grinder, you are buying a new machine.
That is a painful expense for a moment of convenience.
The Cost of Cleaning Tablets
Compare that to the cost of proper cleaning. A pack of grinder cleaning tablets costs $10 to $20. One pack lasts for months.
A small brush costs $5. A vacuum attachment for the grinder chute costs $10. You are spending less than $50 for a year of safe cleaning.
The math is clear. Taking the risk with water is not worth it.
The Hidden Cost of Bad Coffee
Even if you do not destroy the machine immediately, water damage degrades coffee quality. Rusty burrs produce uneven grinds. That leads to channeling, uneven extraction, and bitter or sour shots.
You are wasting good beans on a compromised machine.
The cost of specialty coffee adds up. If you drink two shots a day, you are spending $200 to $400 per year on beans. Getting bad extraction from those beans is a waste of money and time.
Why Anyone Even Thinks of Doing This
I understand the impulse. The question comes from a real place. Let me explain the common scenarios.
Stale Coffee Oils Build Up
Coffee beans contain oils. Over time, these oils coat the burrs, the chute, and the hopper. They become sticky and rancid.
Old coffee oil smells like stale cooking fat. It ruins the flavor of fresh beans.
You want to clean that out. Water seems like the obvious solution. It works on your dishes.
It works on your countertop. Why not the grinder?
The problem is that coffee oils are not water-soluble. They are hydrophobic. Running water through the grinder does not actually remove the oils effectively.
It just pushes them around and spreads them into crevices.
Old Grounds Get Stuck
The grinder retention is real. Every time you grind, some coffee particles stay behind. Over time, they accumulate.
They become stale and can mix with fresh grounds.
You want to flush those out. Water seems like a good flush. But again, the grounds become wet and sticky.
They clump together and clog the chute. You end up with a bigger mess.
A Friend Told Them It Works
This is the most common reason I hear. Someone's friend or a forum post said they rinse their hopper with water and it is fine. Maybe they did it once and got away with it.
That does not mean it is safe.
Survivorship bias is real. The people who destroyed their machines are not posting about it. They are shopping for a new one.
The people who got lucky are sharing their "tip."
The Machine Feels Sturdy
Espresso machines are heavy. They feel solid. It is easy to assume that they are built to handle a little water.
But the internal components are delicate. The machine is designed to handle hot water in the brew group, not in the grinder.
Think of it like a car. The engine bay is robust. But you would not pour water into the air intake.
The grinder is the air intake of your espresso machine.
Someone Wants to Deep Clean
Some people are meticulous about cleanliness. They want to deep clean every part of the machine. That is admirable.
But deep cleaning the grinder requires dry methods, not wet ones.
If you want to disassemble the hopper and wash it separately, that is fine. But you cannot run water through the assembled machine. You have to remove the hopper, clean it by hand, dry it completely, and then reattach it.
The Real Pain Points
Let me list the real frustrations that drive people to water.
- Rancid coffee oil taste
- Stale grounds mixing with fresh
- Visible grime in the hopper
- Musty smell from old coffee
- Desire for a fresh start with new beans
All of these are valid problems. But water is not the solution. In the next section, I will show you what actually works.
The Safe Alternatives That Actually Work
Good news. You can clean your grinder thoroughly without ever touching water. These methods are safer, more effective, and better for your machine.
Grinder Cleaning Tablets
These are the gold standard. Grinder cleaning tablets are made from food-grade grains and oils. They absorb and lift stale coffee oils from the burrs and chute.

Image source: Web (Bing) / oxo.com (Web image (fair-use with source credit))
You run them through the grinder just like coffee beans. They grind up, absorb the oils, and come out as a powder. You then discard that powder.
The burrs are left clean and dry.
Brands like Urnex Grindz and Puly Caff are widely used. A container costs about $12 to $15. It lasts for 30 to 40 cleanings.
That is pennies per use.
A Soft Brush
A small brush with stiff nylon bristles is your best friend. You can use it to sweep loose grounds from the burrs, the chute, and the hopper.
Paintbrushes work well. So do dedicated coffee grinder brushes. Look for one with a angled handle to reach tight spots.
Do not use a wire brush. It will scratch the burrs.
A Vacuum with a Crevice Tool
A handheld vacuum or a shop vac with a narrow attachment can pull loose grounds from the grinder chamber. This is especially useful after brushing.
Some machines have a grind adjustment ring that traps grounds. A vacuum can reach those areas. Just be careful not to dislodge any small parts.
Compressed Air
A can of compressed air (like the kind used for keyboards) can blow out stubborn particles. Use short bursts. Hold the can upright.
Do not tilt it.
This method is great for the chute and the grind adjustment mechanism. It does not leave any moisture behind. It is also useful for drying out a machine that was accidentally exposed to water.
Disassembly and Manual Cleaning
If your hopper is removable, you can take it off and wash it with soap and water. That is safe. The hopper is just a plastic container.
It has no electronics.
Dry it thoroughly before reattaching it. Let it air dry for 12 to 24 hours. Do not use a towel that leaves lint.
For the burrs, you can remove them if your machine allows it. Check your manual. Some machines have a removable burr carrier.
You can then brush the burrs and the chamber clean.
What to Avoid
Do not use wet wipes. Do not use spray cleaners. Do not use dish soap on the burrs.
Do not use any liquid that could drip into the motor.
Stick to dry methods. Your machine will thank you.
Step-by-Step: How to Clean Your Bean Hopper and Grinder the Right Way
Here is a practical routine. It covers daily, weekly, and deep cleaning. No water required.
Daily Cleaning
This takes 30 seconds. Do it every time you finish a bag of beans or once a week.
- Remove the bean hopper if it is removable.
- Wipe the inside of the hopper with a dry, lint-free cloth.
- Brush the burrs with a soft brush.
- Vacuum the grinder chamber with a crevice tool.
- Wipe the outside of the machine.
- Reattach the hopper.
This removes loose grounds and prevents oil buildup.
Weekly Cleaning
This takes 5 minutes. Do it every 2 to 4 weeks depending on how much you use the machine.
- Remove the hopper and any visible grounds.
- Run a dose of cleaning tablets through the grinder (about 30 to 40 grams).
- Discard the ground tablets.
- Brush the burrs and chamber thoroughly.
- Vacuum the chamber.
- Wipe the hopper with a dry cloth.
- Reattach the hopper.
This removes stale oils and keeps the grind consistent.
Deep Cleaning (Every 3 to 6 Months)
This takes 15 to 20 minutes. It requires some disassembly.
- Remove the hopper.
- Remove the burrs if your machine allows it. Consult your manual.
- Brush the burrs and the burr carrier.
- Vacuum the entire grinder chamber.
- Use compressed air to blow out the chute and the grind adjustment mechanism.
- Reassemble the burrs.
- Run a small dose of cleaning tablets to finish.
- Discard the tablets.
- Reattach the hopper.
Washing the Hopper Separately
If you want to wash the hopper, remove it first. Wash it with warm soapy water. Rinse it.
Dry it completely with a lint-free cloth. Let it air dry for 12 hours before reattaching.
Do not put the hopper in the dishwasher. The heat can warp it. The detergent can leave residue.
A Note on Backflushing
Backflushing is a different process. It cleans the brew group, not the grinder. It uses water and a cleaning solution.
It is safe for the brew group. It is not safe for the grinder.
Never run a backflush cycle with the hopper on. The water can splash back into the grinder. Always remove the hopper before backflushing.
When to Worry and What to Do If You Already Did It
If you already ran water through the hopper, do not panic. But act quickly.
Immediate Steps
- Unplug the machine.
- Remove the hopper.
- Turn the machine upside down over a sink. Let any water drain out.
- Use compressed air to blow out the grinder chamber and chute.
- Leave the machine unplugged and open for 24 to 48 hours to dry.
- Do not use the grinder until it is completely dry.
Signs of Trouble
Watch for these symptoms over the next few days and weeks.
- Rust-colored powder in the grind
- A grinding or squealing noise from the motor
- Uneven grind size
- Musty or stale taste in your coffee
- The machine will not turn on
- The motor stalls or runs slowly
If you notice any of these, stop using the machine. Contact a repair technician or the manufacturer.
When to Call a Professional
You should call a repair shop if:
- The machine will not power on.
- You hear unusual noises from the grinder.
- The grind is consistently uneven.
- You see rust flakes in your coffee.
- The machine trips your circuit breaker.
A professional can disassemble the grinder, dry it, and inspect the burrs and motor. They can also replace damaged parts.
When to Replace the Machine
If the repair cost is more than half the price of a new machine, it is time to replace it. A $300 repair on a $500 machine is not worth it. Put that money toward a new one.
Preventing Future Accidents
The easiest fix is prevention. Keep the hopper dry. Do not leave cups of water near the machine.
Do not let anyone else in your household rinse the hopper without knowing the risks.
If you have children, consider a lock for the machine. Some models have a child safety lock feature.
Frequently Asked Questions
Can I rinse the bean hopper if I remove it first?
Yes, if the hopper is completely removable and has no electronics. Wash it with soap and water, dry it thoroughly, and let it air dry for 12 hours before reattaching. Do not run water through the assembled machine.
What about using a damp cloth on the burrs?
No. A damp cloth can leave moisture behind. Use a dry brush or a dry cloth.
If you must use a slightly damp cloth, wring it out completely and dry the area immediately with a dry cloth.
Do cleaning tablets replace the need for a brush?
No. Cleaning tablets remove oils, but they do not remove loose grounds. You need to brush and vacuum to remove the loose particles.
The tablets work best after brushing.
Can I use rice to clean the grinder instead?
Some people use dry rice to clean grinders. It is not recommended. Rice is harder than coffee beans.
It can damage the burrs. It also leaves a starchy residue. Stick to cleaning tablets.
My machine has a "clean" button. Does that mean it is safe to use water?
No. The clean button on some machines activates a self-cleaning cycle for the brew group. It does not clean the grinder.
Never assume the grinder is safe to wet just because the machine has a cleaning mode.
How often should I clean the grinder?
For moderate use (2 to 4 shots per day), clean the grinder with a brush and vacuum every 2 weeks. Use cleaning tablets every 4 to 6 weeks. For heavy use, increase the frequency.
The Bottom Line
Running water through an empty bean hopper in an espresso machine with a built-in grinder is not safe. It damages the burrs, the motor, and the electronics. It voids the warranty.
It costs hundreds of dollars to repair or replace the machine.
The good news is that you never need to do it. Dry cleaning methods work better. They are cheaper.
They are safer. They keep your coffee tasting great.
Stick to a brush, a vacuum, and cleaning tablets. Your machine will last longer. Your coffee will taste better.
Your wallet will stay full.
One final thought. If you ever feel tempted to rinse the hopper, ask yourself this question. Is a 30-second rinse worth the risk of a $500 repair?
The answer is always no. Leave the water for your dishes.

Related posts
Fix Barista Express Pressure Gauge Stuck During Extraction
You load your portafilter, lock it in, pull the shot. The pump whirs. Coffee drips. But the pressure…

Compact Double Espresso: Temp & Time for Golden Crema
If you're wondering what temperature and cooking time for a double espresso shot with thick golden crema in…
Is Breville Barista Express Worth It? Reddit Weighs In
You're scrolling through Reddit, trying to figure out if the Breville Barista Express espresso machine with built in…