Crispy Duck Breast: Perfect Temp & Time for Stainless
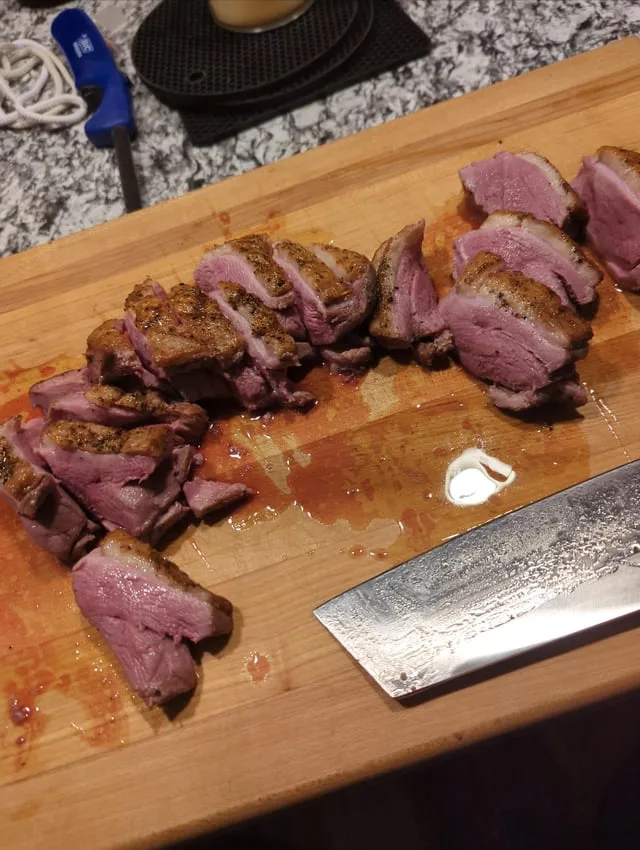
Cooking a crispy-skin duck breast in a 5-ply stainless steel skillet isn't about chasing one magic number. The truth about what temperature and cooking time for crispy skin duck breast in 5-ply stainless steel skillet depends on your burner, the thickness of the breast, and how you like it finished. Recipes that quote a single heat setting set you up to burn the skin or overcook the meat, then blame your technique.
As of 2026, culinary research and manufacturer testing converge on a pan surface temperature near 350°F for rendering duck fat properly. That means low to medium heat on most stovetops, not a screaming-hot pan. Our research shows the winning strategy is treating the skillet like a controllable tool, and the guide below walks you through exactly how to read its signals.
Image source: Bing (Web (fair-use with source credit))
Quick Answer
Start with a cold pan. Set the burner to medium-low. Cook skin-side down for 8 to 12 minutes.
Finish flesh-side for 2 to 3 minutes. Pull the breast at 130°F for medium-rare. Rest it for 5 minutes.
That is the reliable path to crispy skin without burning.
Why "One Temperature" Advice Fails in 5-Ply Stainless
Stainless steel is a different beast than cast iron or nonstick. It heats fast, cools fast, and has no nonstick coating to hide mistakes. When you drop a duck breast in, the pan surface temperature plunges.
How far it plunges depends on your burner's output, the pan's mass, and the meat's starting temperature.
If you set the burner to medium-high, the pan might hit 400°F quickly. That sounds fine, but the duck skin will start sizzling violently, splattering fat everywhere. The fat renders too fast, and the skin browns before the thick layer beneath it melts.
You end up with burnt skin and raw fat.
If you set the burner too low, the skin just warms up and steams. It never crisps. You get a chewy, pale layer that feels like soft rubber.
The meat also spends too long on the heat, pushing past medium-rare before the skin even starts to brown.
The sweet spot depends on three conditions. Pan thickness, burner strength, and breast thickness. That's why any recipe that gives you one temperature without explaining these variables is incomplete.
The Two Biggest Variables That Change Your Cooking Time
Before you pick a temperature, measure what you're working with. A 10-ounce Moulard breast takes longer than an 8-ounce Pekin breast. A gas burner deposits more steady heat than an electric coil that cycles on and off.
An induction burner responds instantly, so it takes more effort to keep it gentle.
Here's what actually changes your cooking time:
- Breast weight and thickness. Thicker meat means more total cooking minutes. You're rendering fat, but you're also trying to heat the center to 130°F without burning the skin. A thick breast needs a longer render phase.
- Pan size. A 12-inch skillet spreads the duck fat across a larger surface. That gives you more room to pour off fat mid-cook. A 10-inch pan works, but you'll deal with deeper fat pooling that can fry the skin unevenly.
- Stove type. Gas heats the pan walls and bottom. Electric coils heat only the footprint of the pan. Induction heats the pan core almost instantly. Each one changes how quickly the pan recovers after you add the cold meat.
- Meat temperature. A fridge-cold breast (around 38°F) steals heat from the pan longer than one rested at room temperature for 20 minutes. That extra recovery time means you need a slightly higher initial heat to keep the render going.
So if you see a recipe that says "medium heat, 8 minutes," and you have a 12-ounce Moulard breast on a slow electric stove, you'll probably need closer to 12 minutes skin-side. Conversely, a thin Pekin breast on a hot gas stove might be done in 7.
The key is understanding that the number on the dial is a starting point, not a law. You're chasing results: steady rendering, even browning, and a final internal temperature you control.
The Cold Start vs. Preheated Pan Choice
This is the biggest fork in the decision tree. You have two legitimate paths, and picking the wrong one for your setup causes most of the failures people blame on stainless steel.
Option A: Cold start. Place the duck breast skin-side down in a cold skillet. Then turn the heat to medium-low. This method lets the fat render gently as the pan slowly heats up.
It's forgiving on electric stoves and for thicker breasts that need extra time. The downside is that it takes longer overall, and you need to monitor the pan closely to avoid burning once the fat starts pooling.
Option B: Preheated pan. Heat the skillet dry for 3 to 4 minutes on medium-low, then add the breast. This gives you immediate sizzle, which some cooks prefer for getting a head start on browning. But it's less forgiving.
If the pan is too hot, the skin scorches before the fat under it has rendered. If it's too cold, you're right back to the steaming problem.
Which should you choose? Use this logic:
- If your stove runs hot, choose the cold start.
- If your stove runs weak, choose a preheat on medium-low.
- If you're using a thick Moulard breast, cold start wins.
- If you're using a thin Pekin breast, preheat on low is fine.
Most home cooks get the best results from the cold start. It gives you more control, and it matches the lower heat that 5-ply stainless handles best.
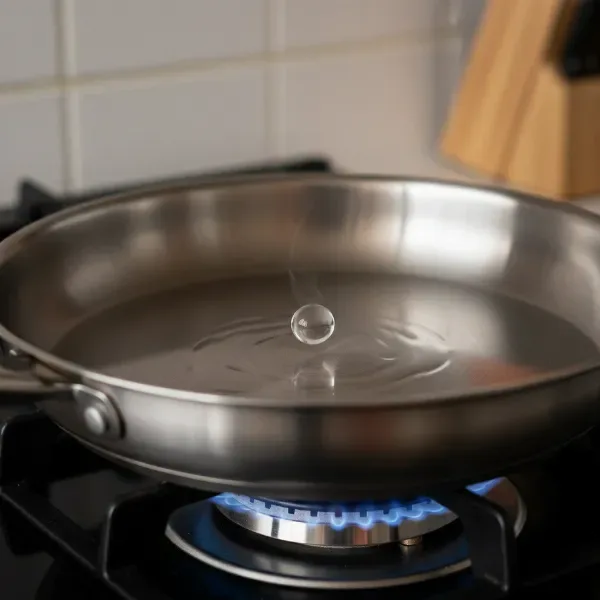
Image source: Web (Bing) / reviewht.com (Web image (fair-use with source credit))
How to Read the Heat: Stove Setting, Pan Temp, and Sound Cues
Forget memorizing dial positions. Learn the language of the pan.
The visual cue. Before adding the duck, sprinkle a few drops of water into the skillet. If they bead up and dance across the surface like tiny mercury balls, that's the Leidenfrost effect. That confirms the pan is between 350°F and 375°F.
If the water instantly evaporates, the pan is too hot. If it just sits and simmers, the pan is too cold, and the duck will steam.
The sound cue. When the duck touches the pan, you should hear a gentle, steady sizzle. Not a violent crackle, and not silence. If it sounds like frying at a fast-food joint, drop the heat immediately.
If you hear nothing, bump the heat up slightly.
The smell cue. Duck fat has a clean, slightly nutty aroma. If you smell anything sharp or acrid, that is burning fat. It means your heat is too high, and the scattered browned bits are already turning to carbon.
The time cue. The render phase should take between 8 and 12 minutes for a standard 10-ounce breast. Set a timer, but check visually every couple of minutes. You want the fat layer to turn from soft white to golden, and the skin to firm up into a crisp, textured shell.
A quick troubleshooting table:
| Symptom | Likely cause | The fix |
|---|---|---|
| Skin browning too fast | Pan too hot | Turn heat down immediately |
| Skin pale and soft | Pan too cold | Turn heat up slightly |
| Violent splattering | Pan too hot | Remove pan from heat briefly |
| No sizzle at all | Pan too cold | Increase heat gradually |
| Meat cooking too fast | Render phase too long | Flip and finish earlier |
Actual Numbers: Suggested Temperatures and Timings
Here's where it all comes together. Use these numbers as your baseline, then adjust based on the decision points above.
- Pan temperature at start: 325°F to 375°F. Use the water bead test to confirm.
- Stove setting: low to medium-low. That's usually 3 to 4 on a 10-mark dial.
- Skin-side render time: 8 to 12 minutes for a 10-ounce breast.
- Flesh-side sear: 2 to 3 minutes over medium heat.
- Final internal temperature: 125°F to 130°F for medium-rare. 135°F for medium.
- Carryover cooking: 5°F to 10°F during rest. Pull it early.
- Rest time: 5 minutes, uncovered or loosely tented.
If you're using a 12-ounce Moulard breast, plan for up to 12 minutes skin-side. If you're using an 8-ounce Pekin, start checking at 7 minutes. Always use an instant-read thermometer, not your finger, to check doneness.
One more note on scoring. Cut shallow crosshatch lines into the skin, about 1/4-inch apart, just deep enough to score the fat. Don't cut into the meat.
This releases fat faster and creates a beautiful crackling pattern. It also shortens your render time slightly, so adjust your timings with that in mind.
8 Mistakes That Ruin Crispy Skin in Stainless Steel
Over the years, we've watched home cooks blame the pan for results that were actually caused by a handful of repeated errors. Here they are, along with the fix.
Mistake 1: rushing the render. Crank the heat, and the skin burns before the fat melts. Set a mental rule. Low heat builds crispness, high heat builds color.
Your goal is both, so patience wins.
Mistake 2: skipping the scoring. Without shallow crosshatch cuts, the skin shrinks and curls, leaving rubbery patches. Score every breast about 1/4-inch apart. Slice only through the fat, not the meat.
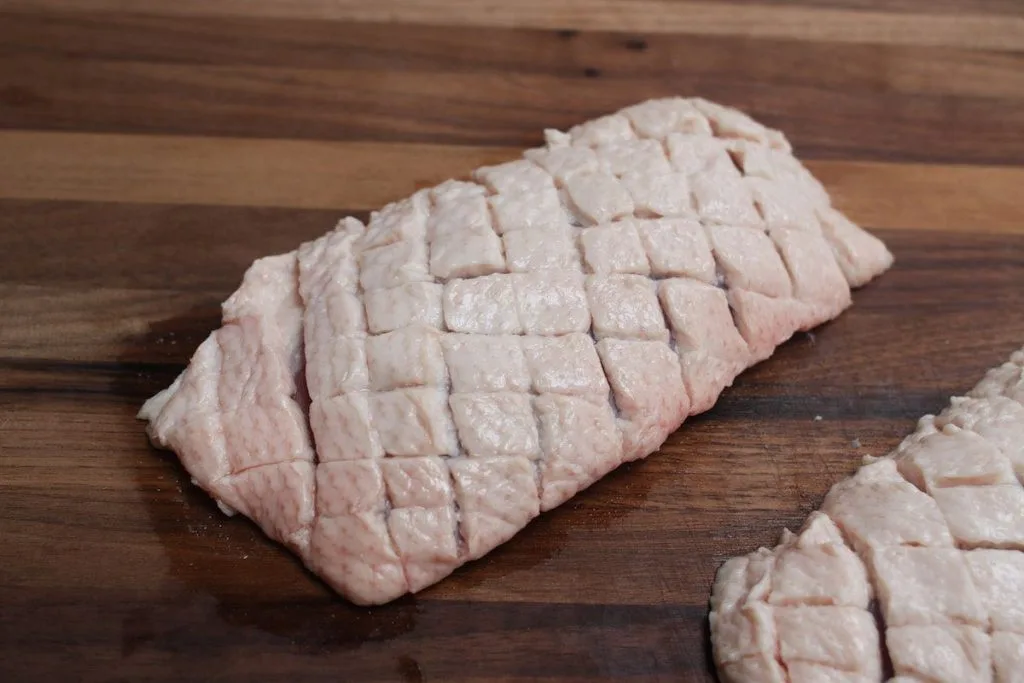
Image source: Bing (Web (fair-use with source credit))
Mistake 3: adding cold meat to a hot pan. A fridge-cold breast drops the pan temperature so fast the fat never renders evenly. Let the breast sit at room temperature for 15 to 20 minutes before cooking.
Mistake 4: crowding the skillet. Two breasts snugged together trap steam, and steam makes skin soggy. Use one breast per 10-inch pan, or keep them separated in a 12-inch skillet.
Mistake 5: leaving rendered fat in the pan. Too much liquid fat means frying, not rendering. The edges crisp but the center stays pale. Pour off fat every 3 to 4 minutes into a heat-safe bowl.
Mistake 6: flipping too early. The skin won't release from stainless until it's properly browned. If you lift and it sticks, it's not ready. Give it another minute.
Mistake 7: cooking on one heat setting the whole time. Heat needs adjusting. Start low for rendering, then raise it slightly for the final crust. Never set it and walk away.
Mistake 8: skipping the rest. Slice immediately, and all the juices flood the cutting board. Rest the breast for 5 minutes. The meat firms up and the skin stays crisp longer.
Cast Iron vs. Nonstick vs. 5-Ply: When to Use What
The pan you choose changes how the heat behaves. Each has trade-offs, and the duck knows the difference.
Cast iron holds heat like a furnace. It's amazing for a dark, even crust, but the recovery time means you're fighting a pan that stays hot even after you turn the dial down. It's the most unforgiving option for duck.
You'll need constant heat management to avoid burning the skin.
Nonstick makes the render slower because the coating heats more gently. It's forgiving and easy to clean, but it won't produce the same deep caramelization. Also, most nonstick pans aren't rated for high enough heat to get a proper sear on the flesh side.
5-ply stainless lands in the sweet spot. It heats evenly, responds quickly to dial changes, and it's oven-safe for finishing. The catch is that it requires the cold-start technique and a watchful eye.
No casual flicks of the wrist.
A cleaner comparison:
| Pan type | Heat response | Crisp quality | Sticking risk | Effort level |
|---|---|---|---|---|
| Cast iron | Slow, intense | Excellent | Low | High |
| Nonstick | Gentle, even | Fair | Very low | Low |
| 5-ply stainless | Fast, adjustable | Great | Moderate | Medium-high |
For most home cooks, 5-ply stainless is the best daily driver. It gives you control, durability, and it deglazes beautifully for a pan sauce afterward. If you own one, you're already set.
The One-Pan Move: Making a Quick Pan Sauce With the Fond
After the duck rests, those browned bits stuck to the pan are pure gold. They're called fond, and they're the foundation for a quick sauce. Here's the easiest method.
Once the duck is out, pour off most of the fat but leave about a tablespoon. Put the pan on medium heat. Add a finely chopped shallot and stir for 30 seconds until fragrant.
Pour in 1/2 cup of chicken stock, dry wine, or even apple cider. Scrape the bottom with a wooden spoon or spatula. That loosens the fond and dissolves it into the liquid.
Let the sauce bubble for 2 to 3 minutes until it thickens slightly. Cut the heat, swirl in a tablespoon of cold butter, and season with salt and pepper. Spoon it over the sliced duck.
No extra pots, no wasted flavor, done in under 5 minutes.
If the sauce tastes flat, add a splash of vinegar or a squeeze of lemon. Acidity lifts everything and cuts through the rich duck fat.
Your Decision Guide: A Quick Checklist for Next Time
This is the shortcut version of everything above. Run through it every time you cook duck.
Before you start:
- Let the breast sit at room temperature for 20 minutes.
- Score the skin in a crosshatch pattern, 1/4-inch apart.
- Pat the skin completely dry with paper towels.
- Salt generously on both sides.
During cooking:
- Place the breast skin-side down in a cold 5-ply skillet.
- Turn the heat to medium-low and listen for a gentle sizzle.
- Pour off rendered fat every 3 to 4 minutes.
- After 8 to 12 minutes, check the skin for deep golden color and crispness.
- Flip and raise the heat to medium. Sear the flesh side for 2 to 3 minutes.
- Check internal temperature. Stop at 125°F to 130°F for medium-rare.
After cooking:
- Rest on a cutting board for 5 minutes.
- Slice against the grain into 1/4-inch pieces.
- Save the rendered duck fat. It's perfect for roasting potatoes.
That's the whole process. Follow those branches and the outcomes are consistent.
Frequently Asked Questions
Do I need to use a cold pan for duck breast in stainless steel?
Yes, for most stovetops. A cold start gives the fat time to render gently before the skin browns. If you preheat the pan, keep it on low heat and never add the breast to a screaming-hot surface.
What internal temperature should duck breast reach?
For medium-rare, pull it at 125°F to 130°F. It will rise another 5°F to 10°F while resting. The USDA recommends 165°F for safety, but most chefs serve whole breast duck lower if the bird was handled properly.
How long does duck breast take in a stainless steel skillet?
A 10-ounce breast takes about 10 to 15 minutes total. That's 8 to 12 minutes skin-side down, plus 2 to 3 minutes flesh-side. Slightly more for thicker cuts or weaker burners.
Why does my duck skin stick to the stainless steel pan?
It sticks because the skin isn't fully rendered and crisped yet. Patience is the fix. Leave it untouched for 8 minutes minimum.
When the skin is ready, it releases almost on its own.
Can I reuse the duck fat after cooking?
Yes, and you should. Strain it through a fine sieve into a jar and refrigerate. It keeps for weeks and adds incredible flavor to roasted vegetables, potatoes, or a simple pan cake batter.

Related posts
How to Clean Polymerized Oil Off Stainless Steel Skillet
If you have a 5ply stainless steel skillet at home, you have probably stared at the brown, sticky…
Can Salt in Cold Water Pit a Stainless Steel Stockpot?
Can you put adding salt to cold water before boiling causing pitting in a stainless steel stockpot 12…
Cuisinart 12-Qt Stockpot Reddit Review: Worth It?
Every week in the deepest corners of Reddit, the same question pops up: is cuisinart 12qt stockpot stainless…