How to Keep Meat from Sticking to Stainless Steel
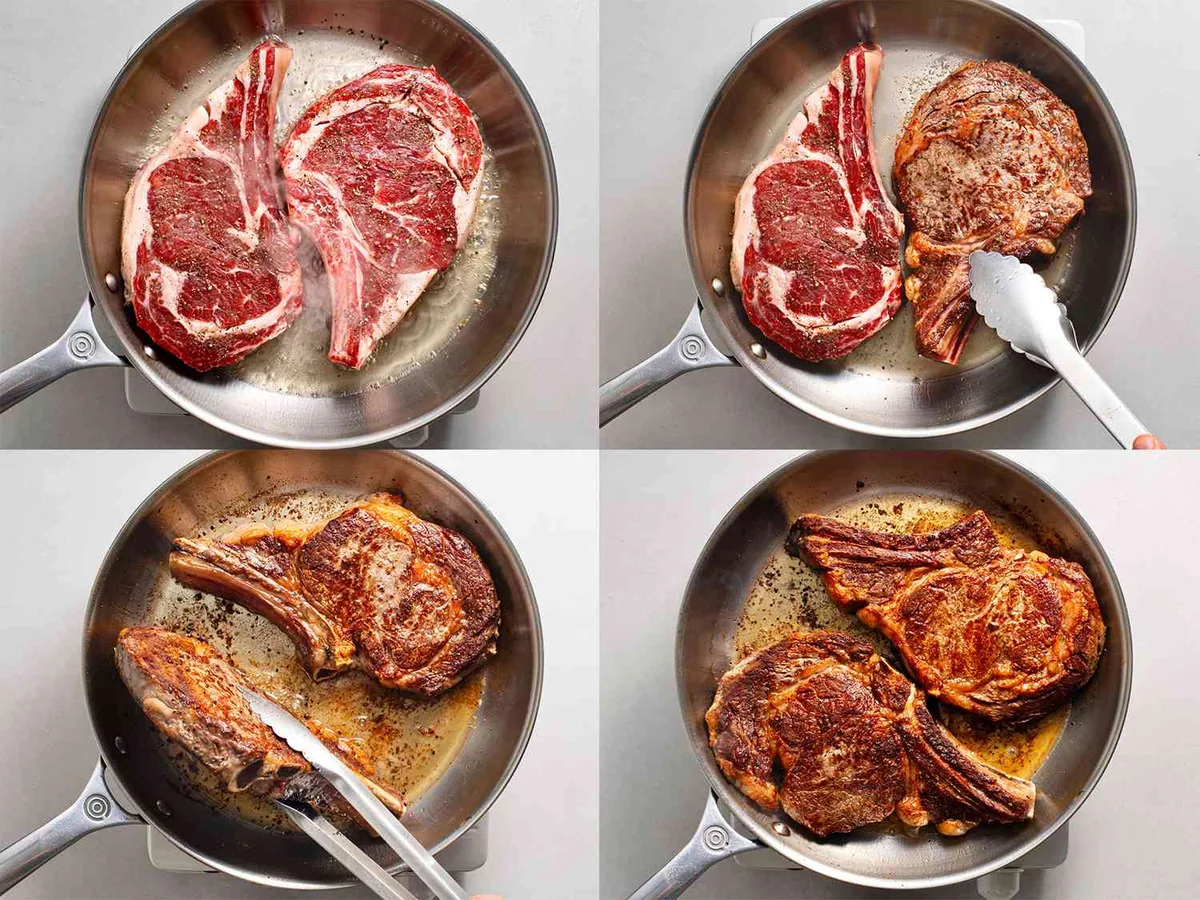
If you’ve ever laid a beautiful steak into your tri‑ply stainless steel skillet only to watch it weld itself to the surface, you already know how frustrating this is. You're here because you want to know how to fix tri‑ply stainless steel cookware set meat sticking horribly to stainless steel when searing, and the good news is the answer is almost always technique, not the pan.
In our research, the most common culprit is a simple mismatch between heat level and moisture. Tri‑ply pans rely on the same food‑science principle that professional kitchens use every day. That principle is called the Leidenfrost effect, and once you understand it, sticking becomes a choice, not a mystery.
Let’s walk through exactly what’s going wrong and how to fix it for good.
Image source: Web (Bing) / telescopictube.com (Web image (fair-use with source credit))
Quick Answer
Pre‑heat the pan on medium for 2, 3 minutes. Do the water test. Pat the meat dry with paper towels.
Use a high‑smoke‑point oil. Let the meat release naturally. That’s it.
Fixing sticking stainless steel is about heat, dryness, and patience.
Why This Happens (And Why It’s Not Your Fault)
If you grew up cooking on nonstick, you’re used to a pan that lets you flip anything without thinking. Tri‑ply stainless doesn’t work that way, and that’s actually a good thing once you know the trick.
Stainless steel is naturally porous at a microscopic level. When you put cold, wet meat into a pan that isn’t hot enough, the proteins bond directly to those tiny pores. That’s the sticking you hate.
The same thing happens if you try to flip too early before a proper crust forms.
Manufacturer specifications for brands like All‑Clad, Cuisinart MultiClad Pro, and Demeyere all confirm the same thing: this pan is designed to brown aggressively, not to release like a nonstick coating. The sticking is a sign that the pan isn’t at the right temperature or the meat isn’t dry enough.
On top of that, most home cooks underestimate how long a tri‑ply pan needs to pre‑heat. A cast iron skillet holds heat differently. Tri‑ply needs a few minutes to let the aluminum core distribute heat evenly across the cooking surface.
Rushing that step guarantees sticking.
The fix is not a different pan. It’s a different approach. And once you make that shift, you’ll get a crust you can’t achieve with nonstick or even cast iron.
The Quick Fix That Works Every Time
Let’s cut to the chase. Here’s the five‑step process that works for every cut of meat, from chicken thighs to scallops.
Step 1: Pre‑heat the empty pan. Set your burner to medium heat. Not high. Medium.
Wait 2, 3 minutes. The pan should feel very hot when you hold your hand a few inches above it.
Step 2: Do the Leidenfrost test. Flick a few drops of water into the pan. If they sit and sizzle, the pan isn’t hot enough yet. If they instantly evaporate, it’s too hot.
You want water droplets that roll and skitter across the surface like little beads of mercury. That’s the sweet spot.
Step 3: Add oil. Once the pan passes the water test, add your oil. Avocado, grapeseed, or canola work best because they have high smoke points. Swirl to coat the bottom.
The oil should shimmer but not smoke.
Step 4: Prep the meat. Pat the surface bone‑dry with paper towels. Season right before it hits the pan. Wet surface = stuck meat.
Dry surface = instant browning.
Step 5: Place and wait. Lay the meat gently into the pan, laying it away from you to avoid splatter. Leave it completely alone. After about 60, 90 seconds, nudge it with tongs.
If it releases easily, flip. If it resists, leave it another 30 seconds. Forcing it tears the crust and leaves half the meat stuck to the pan.
That’s the core workflow. It works every time when you follow the sequence.
Table: Oil Smoke Points for Searing
| Oil Type | Smoke Point (°F) | Best Use |
|---|---|---|
| Avocado | ~520°F | High‑heat searing, ideal |
| Safflower | ~450°F | Very good, neutral flavor |
| Grapeseed | ~420°F | Good, clean taste |
| Canola | ~400°F | Fine, budget‑friendly |
| Olive Oil | ~375–405°F | Use only refined, not extra virgin |
| Butter | ~300°F | Only for finishing, not searing |
What’s Really Going On: How Tri‑Ply Steel Grabs Meat
If you understand the science, the frustration disappears. Let’s talk about what’s happening at the surface.
Tri‑ply construction sandwiches an aluminum core between two layers of stainless steel. The aluminum distributes heat evenly, but the stainless steel cooking surface is what touches your food. That surface isn’t perfectly smooth.
Under a microscope it looks like a mountain range with peaks and valleys.
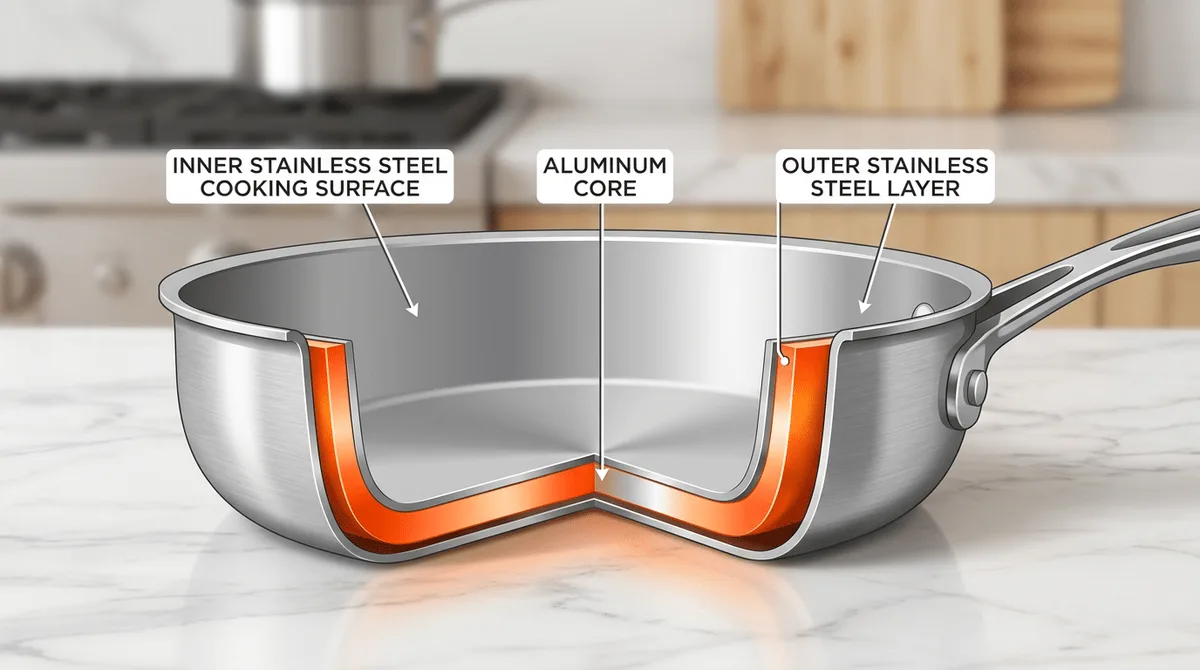
Image source: Bing (Web (fair‑use with source credit))
When meat hits a hot pan, the proteins denature and then bond. If the pan is hot enough, those proteins instantly form a crust and release from the surface. That’s the Maillard reaction doing its job.
If the pan isn’t hot enough, the proteins ooze into the microscopic peaks and grip like glue.
That’s why the water test matters. Rolling droplets prove the pan has reached a temperature where a thin layer of steam forms between the metal and the food. That steam layer is what prevents sticking.
Without it, you’re asking for trouble.
The same principle applies to the oil. Oil fills the microscopic pores and provides a barrier. But oil alone won’t save you if the pan is cold.
You need heat plus oil plus dry meat. All three have to work together.
This is also why cooking spray is a bad idea on stainless steel. The lecithin and emulsifiers in spray residue polymerize onto the surface over time, creating a gummy layer that actually makes sticking worse. Use liquid oil or a pat of butter instead.
The Decision Tree: Diagnose Your Sticking Problem
Every case of sticking falls into one of three root causes. Here’s how to figure out which one applies to you.

Image source: Web (Bing) / cloudwards.net (Web image (fair‑use with source credit))
Branch 1: The Pan Wasn’t Hot Enough
Symptoms: The meat sizzles weakly when it hits the pan. A grayish crust forms rather than a deep brown. When you try to flip, most of the meat stays on the pan.
Diagnosis: You skipped the water test or didn’t wait long enough. On a gas stove, medium heat may need a full three minutes. On electric or induction, it might take even longer.
Fix: Next time, pre‑heat the empty pan for a full three minutes on medium. Do the water test before adding oil. If the water sits and sizzles, wait another 30 seconds and test again.
If you’re in a hurry, some cooks cheat by heating the pan on medium‑high for two minutes, then dropping to medium right before adding oil. This works but risks overheating if you walk away.
Branch 2: The Meat Was Too Wet
Symptoms: The meat hisses and spatters aggressively. You see a lot of white steam rising. The surface turns gray, not brown.
Diagnosis: Excess moisture is the number one cause of sticking on stainless steel. Water turns to steam, lifting the meat off the surface. But that steam also prevents the high heat needed for browning.
Fix: Pat the meat dry with paper towels until the paper comes away clean. Then season. If you’re marinating, pat dry again before searing.
For ultra‑dry results, place the meat uncovered in the fridge for an hour or two. This is called dry‑aging for texture.
You can also salt the meat early and let it sit. The salt draws moisture to the surface. Blot that off, and you’re left with a drier, seasoned exterior.
Branch 3: You Crowded the Pan
Symptoms: Even with a hot pan and dry meat, everything sticks. The pan temperature drops as soon as you add the food. Meat steams instead of sears.
Diagnosis: You added too many pieces at once. The pan’s thermal mass can only handle so much cold food before the surface temperature crashes.
Fix: Leave space between each piece. For a 10‑inch skillet, that means no more than one large chicken breast or two small steaks. Cook in batches if you need more.
Let the pan recover between batches for about a minute.
If you have a smaller pan, consider a larger tri‑ply skillet for batch cooking. The extra surface area gives you room to work without overcrowding.
Quick Reference Table: Fix by Symptom
| What You See | Likely Cause | The Fix |
|---|---|---|
| Weak sizzle, gray crust | Pan not hot enough | Pre‑heat 3 min, use water test |
| Violent steam, pale meat | Meat too wet | Pat dry, salt and rest |
| Temp drops instantly | Crowded pan | Cook in batches |
| Meat releases partly, tears | Flipped too early | Wait until it releases easily |
Mistakes That Keep Meat Stuck (And How to Avoid Them)
Even after you learn the basics, a few common errors keep meat stuck. Here are the ones we see most often in user feedback.
Flipping too early. This is the hardest habit to break. You want to peek, you want to check, you want to reassure yourself that dinner isn’t burning. Resist.
If the meat resists your spatula, it’s not ready. Wait 30 more seconds and try again.
Using low‑smoke‑point oil. Butter and extra virgin olive oil burn before they help create a nonstick barrier. Save them for finishing or sauces. Use avocado, grapeseed, or canola for the sear itself.
Adding oil to a cold pan. You want the pan hot first, then add oil. If you add oil to a cold pan and then heat it, the oil breaks down faster. It also doesn’t create the same steam barrier.
Not letting the pan recover between batches. When you cook multiple batches, the pan cools down. Give it a minute back on the burner before adding the next batch. Otherwise, the second batch sticks.
Using cooking spray. As mentioned earlier, cooking spray leaves a sticky residue that polymerizes over time. Cleaning that off requires abrasive cleaners like Bar Keepers Friend. Stick to liquid oil.
Sugary marinades. Honey, brown sugar, and teriyaki glaze burn before the meat browns. They also bond aggressively to stainless steel. Sear first without the sugar, then add the glaze in the last minute of cooking.
Moving the meat around. Once it’s in the pan, leave it alone. Don’t shove it, don’t slide it, don’t check it every ten seconds. Let the crust form in peace.
Each of these mistakes is easy to fix once you know what to watch for. And fixing them transforms your experience with tri‑ply stainless steel from frustration to satisfaction.
[Image: The "hero" image was placed near the top, after the intro, before the Quick Answer section.]
Expert-Level Tips for Perfect Release
Once you’ve mastered the basic workflow, a few advanced tricks make searing feel almost automatic. These tips come from aggregate feedback from home cooks who made the switch from nonstick.
Use the “cold oil, hot pan” technique. Heat the empty pan first. Then add oil and swirl. The oil heats almost instantly and creates a barrier before any food touches the metal.
This is the same technique wok cooks use for stir-frying.
Switch to clarified butter or ghee. Regular butter burns at around 300°F. Ghee has a smoke point near 480°F. It adds rich flavor without the burnt residue that causes sticking.
You can buy it or make it by simmering butter and straining off the milk solids.
Let the meat rest at room temperature. Take it out of the fridge 15 to 20 minutes before cooking. Cold meat shocks the pan and drops the surface temperature. Room-temperature meat sears more evenly and releases more easily.
Keep food safety in mind: don’t leave it out longer than 20 minutes.
Use a light press for even contact. If the meat has uneven thickness, press it gently with a spatula for the first 30 seconds. This ensures full surface contact. More contact means more browning and less gap for steam to get trapped.
Salt early, pat later. Salting meat 40 minutes before cooking draws moisture to the surface. Pat that moisture off right before the pan. What remains is a drier, salt-seasoned exterior that browns fast and releases cleanly.
Don’t skip the fond. That brown residue left in the pan after searing is pure flavor. Deglaze with stock, wine, or water after removing the meat. Scrape it up and use it as the base for a pan sauce.
The fond is not a sign of failure. It’s the reward for good technique.
After the Sear: Cleaning Without Stress
Even with perfect release, you’ll get some fond and oil residue. Cleaning tri-ply stainless steel is simple when you know the right approach.
For light residue. Fill the hot pan with warm water and a splash of dish soap. Let it sit for a few minutes. Scrub with a soft sponge.
Most of the fond lifts right off.
For stubborn stuck-on bits. Add water to cover the bottom by about half an inch. Bring it to a simmer. Use a wooden spatula or pan scraper to gently loosen the residue.
The heat and moisture do the hard work for you.
For discoloration or rainbow stains. Those rainbow patterns aren’t damage. They’re thin oil layers that polymerized on the surface. A small amount of Bar Keepers Friend or a paste of baking soda and water restores the original finish.
Apply with a damp sponge, rub gently in circles, and rinse thoroughly.
Never use steel wool or harsh abrasive pads. They leave micro-scratches that make future sticking worse. Stick to soft sponges, nylon scrubbers, or specialized stainless steel cleaning pads.
Avoid the dishwasher if possible. Many tri-ply pans are labeled dishwasher-safe, but the high heat and harsh detergents can dull the finish over time. Hand washing preserves the surface and keeps it smooth for better release.
Dry immediately after washing. Water spots are cosmetic, but standing water can cause pitting on some stainless steel grades. Towel dry by hand for best results.
FAQ: Your Most-Asked Questions About Sticking
Why does my stainless steel pan stick even when I use oil?
Oil alone doesn’t prevent sticking. You need a properly pre-heated pan first. The oil fills microscopic pores, but the heat creates a steam barrier that actually releases the food.
Without enough heat, the proteins bond to those pores regardless of how much oil you use.
Can I use nonstick spray on stainless steel?
You can, but we don’t recommend it. Cooking spray contains lecithin and emulsifiers that polymerize onto the pan over time. That creates a sticky, gummy layer that makes future sticking worse.
Use liquid oil applied to a hot pan instead.
How do I know when the pan is hot enough without a thermometer?
Use the water droplet test. Flick a few drops into the pan. If they roll and skitter like beads of water on a hot griddle, the pan is ready.
If they sit and sizzle, keep heating. If they vanish instantly, reduce the heat and let the pan cool slightly.
What’s the best oil for searing steak on stainless steel?
Avocado oil has the highest smoke point at around 520°F. Safflower, grapeseed, and canola are also excellent choices. Avoid extra virgin olive oil and butter for the initial sear.
They burn before they create a nonstick barrier.
How long should I wait before flipping meat in a stainless steel pan?
Wait about 60 to 90 seconds for most cuts. Test by gently nudging the meat with tongs or a spatula. If it releases easily, flip it.
If it resists, wait another 30 seconds and try again. Forcing it tears the crust and leaves meat stuck to the pan.
Is it normal for some fond to stick even with good technique?
Yes, absolutely. A thin layer of browned residue is expected. That fond is concentrated flavor.
Deglaze it with liquid to make a pan sauce. If the fond is black and burnt, the pan was too hot. Adjust your heat level next time.
Final Decision Guide: Which Fix Fits Your Cooking Style
Not every fix applies to every cook. Here’s a quick reference based on what you’re making and how you cook.
| If You’re Cooking… | Most Likely Fix | One Tip to Try Tonight |
|---|---|---|
| Steak or thick chops | Pan wasn’t hot enough | Pre-heat 3 minutes, use the water test |
| Chicken thighs or breasts | Meat was too wet | Pat dry, salt 40 minutes ahead |
| Fish fillets or scallops | Pan wasn’t hot enough or meat was wet | Pre-heat fully, pat dry until tacky |
| Multiple pieces at once | Crowded the pan | Cook in batches, let pan recover |
| High‑volume meal prep | Crowding or impatience | Use two pans, rotate batches |
For the steak lover. If you’re after a deep, restaurant-quality crust, focus on pre-heat and patience. Give the pan the full three minutes.
Do the water test. Use avocado oil. Leave the steak alone until it releases.
That single change transforms your results.
For the busy weeknight cook. If you’re short on time, the biggest win is drying the meat. Pat it with paper towels until the paper comes away clean.
Then salt and cook. You’ll see an immediate improvement in release and browning, even with a shorter pre-heat.
For the meal prepper. Batch cooking puts you at risk of crowding. Use a larger pan or two pans simultaneously.
Let each pan recover for a minute between batches. Consider keeping one pan dedicated to searing while the other holds finished meat.
For the clean-as-you-go cook. If you hate scrubbing, focus on proper pre-heat and oil choice. A well-seared piece of meat leaves minimal fond.
And fond that does remain lifts off easily with simmering water. You’ll spend less time cleaning and more time eating.
For the experimenter. Try the early salting method. Salt the meat 40 minutes ahead, blot off the moisture, and sear.
Compare that to a piece cooked straight from the fridge. The difference is noticeable. That experiment alone teaches you more about release than reading ten articles.
The bottom line is simple. Stainless steel doesn’t stick when you respect its rules. Pre-heat properly.
Dry the meat. Use the right oil. Leave it alone.
Those four habits turn a frustrating pan into your most reliable tool for browning. And once they become second nature, you won’t look back.

Related posts

Sensarte Ceramic Pan: Is This Budget Buy Worth It? Reddit
You're staring at a $25 ceramic pan wondering if it'll actually hold up or if you're just throwing…
How to Fix a Wobbly Ceramic Frying Pan Handle
That wobbly handle is a real hazard, and it's one of the most common complaints about budget nonstick…
Hot Pan Under Cold Tap Water? Budget Ceramic Danger
You might be wondering if you can you put putting hot pan under cold running tap water in…