How to Clean an Enameled Dutch Oven & Remove Stains
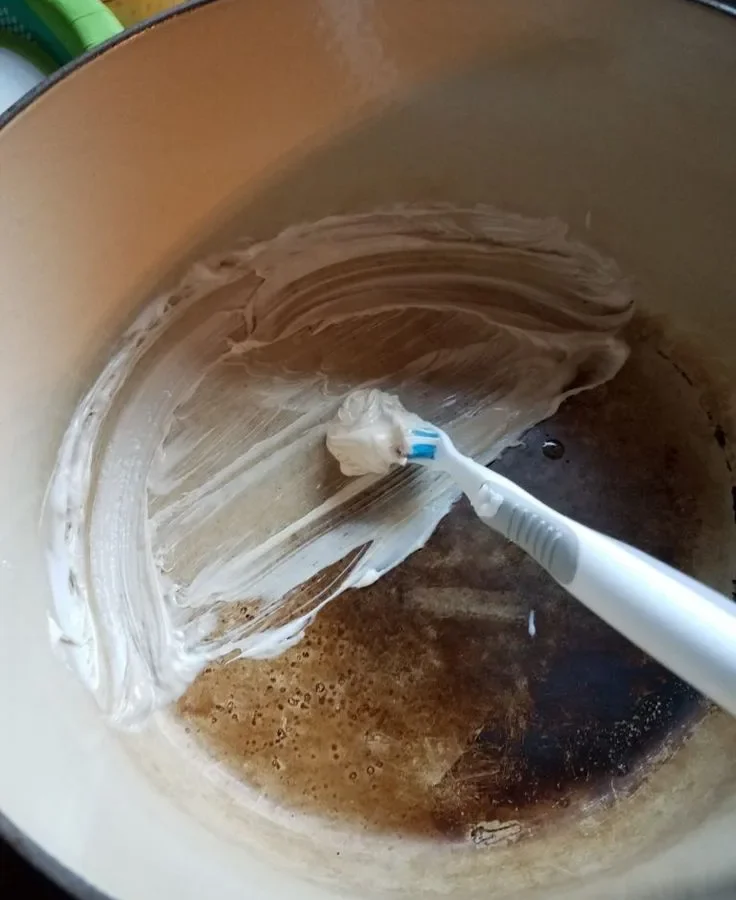
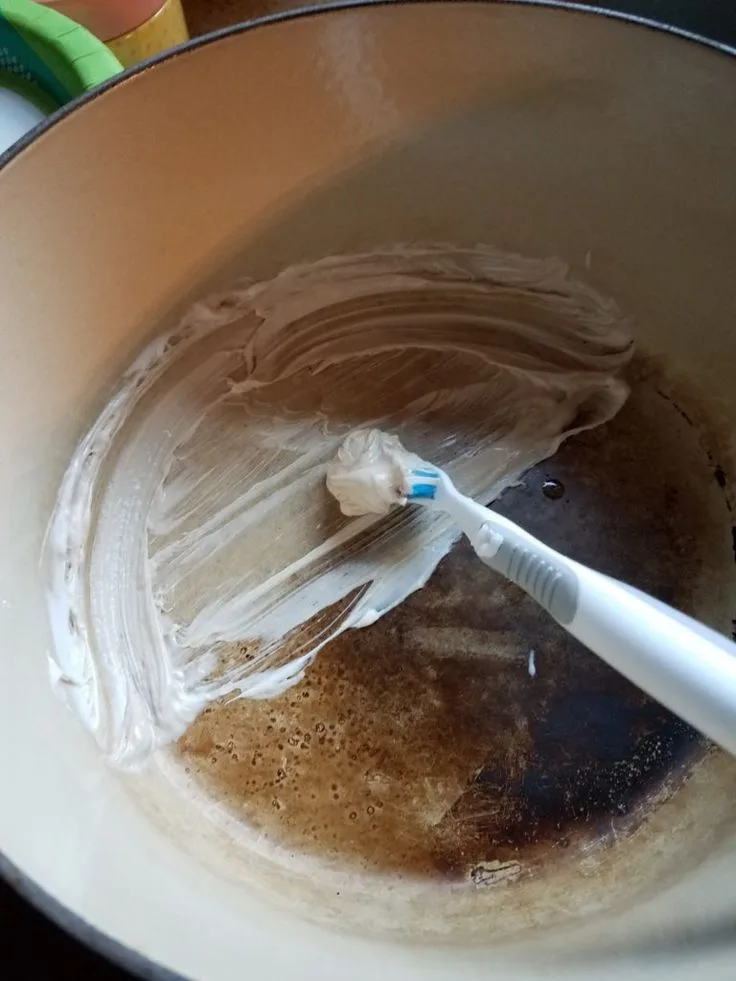
If you look inside your Dutch oven and see brown stains on the white enamel, you’re not alone. Learning how to clean enameled cast iron dutch oven and remove brown baked-on stains on interior white porcelain enamel is one of the most common questions we hear from home cooks. That brown residue is usually polymerized oil, a thin layer of oil that bonds to the surface at high heat.
Manufacturer care guides warn against using the oven’s self-clean cycle. It can reach temperatures over 900°F. That extreme heat can crack or dull the enamel permanently.
The right approach depends on what type of stain you’re dealing with. That’s why we’ll start by identifying the problem before picking up any cleaner.
Quick Answer: A Cleaning Flow That Handles 9 Out of 10 Stains
Simmer water with baking soda to loosen stuck-on food. For polymerized oil, apply a baking soda paste. Let it sit for 15 minutes.
Scrub gently with a nylon brush. For stubborn discoloration, use an oxalic acid cleaner. For charred crust, use a lye-based oven cleaner.
Always rinse thoroughly.
First: Identify the Stain Before You Touch Anything
You can’t clean what you can’t identify. Touch the stain with a dry finger. If it feels smooth and slick, that’s polymerized oil.
If it feels rough or crusty, you’ve got burnt-on food residue. The visual cue matters too. Polymerized oil looks like a thin, amber or brown film.
Burnt-on food looks thick, dark, and often flaky.
How to Tell Polymerized Oil from Burnt-On Food
Polymerized oil usually shows up in a ring around the pot. It forms where the oil line was during cooking. It’s glossy and hard.
Burnt-on food is duller. It’s often black and can peel off in pieces. You can also try a gentle scrape with a wooden spatula.
If it flakes off, it’s food. If it smears, it’s oil. This simple test saves you from using the wrong cleaning method.
Why the Wrong First Step Causes the Most Damage
If you attack polymerized oil with a heavy abrasive, you risk scratching the glass-like enamel. Those scratches become permanent. They hold onto the next meal’s residues and trap bacteria.
On the other hand, if you try a mild baking soda soak on a thick burnt-on crust, you will waste time. You might think the method doesn’t work. You need the right tool for each type.
Per manufacturer specifications, avoiding abrasives on white enamel prevents micro-scratches that turn gray over time. As of 2026, most brands still recommend nylon brushes over scouring pads.
Decision Branch 1: Loosening Stuck-On Food with a Baking Soda Boil
Start here if you can feel or see chunks of food stuck to the surface. This method works by using gentle heat and alkaline water to soften the residue. It is the safest first step for any stain you’re unsure about.
Here is the process:
- Scrape out any loose debris with a wooden spatula.
- Add water about an inch deep inside the pot.
- Add a heaping teaspoon of baking soda for every cup of water.
- Bring the water to a simmer on the stovetop.
- Let it bubble gently for 5 to 8 minutes.
- Turn off the heat and let the water cool slightly.
- Scrape again with a wooden spatula.
- Wash with dish soap and a nylon brush.
- Rinse thoroughly and dry.
This combination lifts stuck-on food without scrubbing. The baking soda helps break down proteins and carbohydrates. The heat speeds up the reaction.
After this step, if the original stain is gone, you are done. If a thin brown film remains, move to the next branch. This method is especially effective if you’ve been wondering how to use Presto deep fryer techniques to loosen similar carbon buildup, but on a stovetop instead.
The same alkaline soak principle applies.
One important note: never let the pot boil dry. If the water evaporates completely, the baking soda can concentrate and leave a white residue. That’s harmless but annoying to wipe off.
Keep an eye on the simmer.
Decision Branch 2: Removing Brown Polymerized Oil with a Paste
Use this method when the stain is smooth, thin, and brown. This is the most common issue for white enamel interiors. The baking soda paste creates a mild abrasive that polishes away the polymerized layer without scratching.
Here is the process:
- Mix three parts baking soda to one part water.
- Stir until it forms a thick paste. It should be spreadable but not runny.
- Spread the paste over the stained area. Cover it completely.
- Let it sit for 15 to 30 minutes. The longer it sits, the more effective it is.
- Dampen a nylon brush or soft sponge.
- Rub the paste in circular motions. Use gentle pressure.
- Rinse with warm water.
- Check the result. Repeat if needed.
The key is patience. The paste needs time to soften the polymerized layer. Gentle pressure is better than hard scrubbing.
This process takes less than 45 minutes total. It works for 80 percent of brown stains. Avoid using steel wool or metal pads.
They leave scratches that ruin the glossy finish.
This mild abrasive technique is similar to tackling tough food residue on other kitchen appliances, but it is much kinder to enameled surfaces. The same logic applies when you handle the same kind of stuck-on grease in an air fryer. Soaking and gentle abrasion are the universal cleanest method.
If the paste method does not remove the stain completely after two tries, move to the next branch. Some polymerized oil layers are too thick for baking soda alone.
Decision Branch 3: Using Oxalic Acid Cleaners for Stubborn Discoloration
Oxalic acid cleaners come in powder or cream form. The one you may know best is a common household cleanser sold in most grocery stores. These products are safe for porcelain enamel.
They work by chemically breaking down the polymerized oil bonds. You should only use this method after trying baking soda first.
Here is the process:
- Wet the stained area with water.
- Sprinkle or apply the cleaner directly onto the wet surface.
- Rub gently with a damp sponge or nylon brush.
- Let it sit for 1 to 3 minutes. Do not exceed this time.
- Rinse thoroughly with warm water.
- Wash with dish soap afterward to remove any chemical residue.
Do not leave oxalic acid on the enamel overnight. It can dull the glossy surface if left too long. This method is best for stains that resist baking soda.
It is also useful for removing tea or coffee stains from white enamel. Always wear gloves when handling chemical cleaners. Rinse well to remove all residue.
Aggregate reviews indicate that oxalic acid cleansers are highly effective for restoring white enamel. Many users report that it lifts years of staining in minutes. However, you must test it on a small area first if you have vintage cookware.
The enamel on older pieces may be less durable.
For extreme cases, where the interior has a thick black crust that feels charred, you may need a lye-based oven cleaner. That method involves spraying the cleaner, sealing the pot in a plastic bag, and letting it sit overnight. This requires gloves and ventilation.
Use it only as a last resort, and follow all safety instructions.
Decision Branch 4: Heavy-Duty Lye Oven Cleaner for Charred, Carbonized Crust
If the stain is a thick black crust that resists everything else, it's time for a lye-based oven cleaner. This is the most aggressive option. Use it only after baking soda, oxalic acid, and boiling have all failed.
This method works by dissolving carbonized organic matter. Lye breaks down burnt grease that abrasives cannot reach.
Here is the process:
- Wear rubber gloves and work in a well-ventilated area.
- Make sure the pot is cool and dry.
- Apply a thick layer of lye-based oven cleaner over the charred spots.
- Do not use it on aluminum handles or knobs. The lye will corrode them.
- Place the pot inside a large plastic garbage bag. Tie the bag closed.
- Leave it overnight for 8 to 12 hours.
- Remove the pot.
- Scrape the softened crust with a plastic scraper.
- Wash thoroughly with dish soap and warm water.
- Rinse multiple times to remove all chemical residue.
This method is very effective. Aggregate reports suggest it works when the interior looks hopelessly dark. But there are firm rules.
Never mix lye-based cleaner with bleach or any acid. The fumes can be dangerous. Never let the cleaner sit longer than 24 hours.
Lye can soften enamel over time.
Check the enamel first for cracks or chips. If the underlying cast iron is exposed, the cleaner can seep in and cause rust. For most people, this step is never needed.
The baking soda paste and oxalic acid cleaners handle almost every stain. This branch is the last resort. It works, but it needs total focus and caution.
Mistakes That Ruin Enamel: What Not to Do at Any Stage
One wrong move can turn a stain problem into a permanent damage problem. The most common error is reaching for metal tools. A metal spatula or steel wool scratches the glossy surface.
Those scratches collect food and rust. You cannot repair them. Avoid them forever.
Here are the other top mistakes:
- Running the pot through the dishwasher. High heat and harsh detergents dull the enamel.
- Plunging a hot pot into cold water. Thermal shock causes cracking and chipping.
- Using the oven's self-clean cycle. It gets hot enough to ruin the enamel finish.
- Leaving food in the pot for days. Acidic leftovers can etch the white surface.
- Scrubbing hard with abrasive scouring pads. They wear away the smooth gloss.
- Stacking other pans inside without protection. Metal edges can chip the rim.
The enamel on these pots is glass-like. It handles heat and food well. It doesn't handle physical impact or harsh cleaning.
Treat it like a heavy glass dish. Would you put glass in the dishwasher with metal pans? No.
Same logic here.
If you clean any other kitchen appliances with stubborn grease, you already know the pattern. Gentle soaking and soft scrubbing beat aggressive scouring every time. The same soak-and-scrub approach works across different cookware and kitchen gadgets.
It just takes patience.
After the Stain Is Gone: Care, Drying, and Long-Term Maintenance
Once the white interior is bright again, protect your work. Hand washing is the only safe method. Use warm water, mild dish soap, and a soft sponge.
Rinse very thoroughly. Soap residue can leave a gray film on porcelain enamel.
Dry the pot completely after washing. Air drying can leave water spots. Use a clean towel.
Then put it away. No seasoning is needed. The enamel coating is naturally non-stick and non-porous.
Oil will not protect it. It will only attract dust.
If you notice a chip that exposes the bare cast iron, stop using the pot for cooking. Acidic foods can pull iron into the dish and rust the exposed area. You can keep it for bread baking if you line it with parchment paper, but the safest option is to contact the manufacturer about warranty coverage.
Most brands cover lifetime chipping on interior enamel.
To prevent future brown stains, adjust how you cook. Use medium heat instead of high. Preheat the pot slowly.
Add oil or liquid before heating. When baking bread, line the pot with parchment paper to protect the floor and sides. Clean the pot soon after you finish cooking.
Let it cool, wash it, and dry it. Stains are much easier to remove when they are fresh.
For routine care, occasional baking soda paste treatments keep the interior looking new. You can also use a gentle appliance cleaner on the exterior. Avoid abrasive powders on the white surface.
With the right maintenance, an enameled Dutch oven can last decades.
Frequently Asked Questions
Can I use bleach to whiten the interior?
No. Bleach is too harsh for porcelain enamel. It can dull the surface and may leave harmful residues.
Use a baking soda paste or a mild oxalic acid cleaner instead. Those are safe and effective.
Is it safe to use Bar Keepers Friend on enameled cast iron?
Yes, the original powder formula contains oxalic acid and is safe for porcelain enamel. Apply it gently with a damp sponge. Rinse thoroughly afterward.
Do not use it on exposed cast iron chips.
Why does my Dutch oven smell soapy after cleaning?
That means soap residue is trapped in tiny surface scratches. Wash the pot again with plain hot water. Add a small amount of white vinegar to neutralize the smell.
Rinse very well. Dry immediately.
How do I remove brown stains without scratching the enamel?
Use a nylon brush or soft sponge with a baking soda paste. Let the paste sit for 15 to 30 minutes. Rub gently.
Never use steel wool or metal scrapers. The goal is to polish the stain away slowly, not scrape it off.
Can I use the oven's self-clean cycle to burn off stains?
No. The self-clean cycle gets hotter than 900°F. That temperature can crack the enamel and damage the cast iron core.
It voids the warranty on most brands. Stick to stovetop methods.

Related posts
Lodge 6-QT Enameled Dutch Oven: Worth It? Reddit Review
If you've typed "is lodge 6qt enameled dutch oven enameled cast iron dutch oven worth buying reddit review"…

Perfect Beef Bourguignon: Oven Temp & Time Guide
You're staring at a pool of winesoaked meat that's somehow both dry and tough. That's not beef bourguignon.…
Can You Use Metal Immersion Blender in Enameled Braiser?
Let me answer that question straight: can you put using metal immersion blender directly in enameled braiser in…